NeuroIK Documentation
Desktop robot design, analysis, training & deployment
1Overview
NeuroIK is a desktop application for designing a robot arm, understanding how it behaves, and getting it to do something useful. It covers the whole path from a folder of CAD meshes to a trained model on an ESP32 — and every stage in between is a workflow you can use on its own.
1.1 The six workflows
The landing page offers six. They share one robot description, so a robot built or imported in one is immediately available to the rest — with its joint limits, link lengths and mass properties carried through rather than re-entered.
CAD → URDF/Xacro
Where a robot comes from when all you have is meshes. Build links and joints, set axes and limits, and generate a validated URDF.
Open this tabIK Calculator
Exact inverse kinematics with the algebra shown in your own numbers — closed-form where the geometry permits, numerical where it does not, and both compared side by side.
Open this tabJacobian & Singularity
How freely the arm moves once it is there: manipulability, conditioning, the velocity ellipsoid, and where in its travel it loses a direction of motion.
Open this tabTorque & Dynamics
What each joint actually has to deliver — gravity, inertia, Coriolis and friction — plus payload limits and motor sizing.
Open this tabMotion & Path Planning
Teach a sequence of poses, interpolate it, solve it into joint space, schedule it against velocity and acceleration limits, and export it to your controller.
Open this tabML for IK you are here
Train a neural network to solve inverse kinematics for one specific arm, validate it in a 3D viewport, and export it to ten deployment targets.
Continue below1.2 What is in the box
Robot types
SCARA, Delta, Cartesian, Articulated (2–12 DOF), or import your own URDF/Xacro
Architectures
MLP, Transformer, GNN, Diffusion, PINN, RL Agent
Export targets
ONNX, PyTorch, TorchScript, TF Lite, Keras H5, TensorRT, ROS2, TinyML, native DLL, Core ML
Under the hood
HTML5 / CSS3 / Vanilla JS + Three.js + Chart.js, on a Python 3.11 · FastAPI · PyTorch 2 engine
1.3 This workflow: teaching a network to solve IK
The rest of this tab is the ML for IK workflow: design a robot, generate a dataset from it, train a model, check the model in a live 3D viewport, and export it for deployment — from an NVIDIA GPU down to an ESP32.
The core idea: FK-first data
Inverse kinematics asks: “which joint angles put the gripper here?” Generating training data by guessing poses would fill the dataset with unreachable targets. NeuroIK inverts the problem:
- Your recipe defines each joint's limits.
- Random joint values are sampled within those limits.
- Forward kinematics computes exactly where the end-effector lands.
Every row is therefore reachable by construction, and the network learns the inverse of a guaranteed-correct mapping. No impossible poses ever enter training.
2Installation & Launch
2.1 System requirements
| Component | Minimum | Recommended |
|---|---|---|
| OS | Windows 10/11, macOS 12+, Ubuntu 22.04+ | Windows 11 |
| Python | 3.11+ | 3.11 |
| RAM | 8 GB | 16 GB |
| GPU | None — CPU fallback | NVIDIA, CUDA 11.8+ |
| Disk | 2 GB | 8 GB (PyTorch + TensorFlow) |
2.2 Install & run
Put the NeuroIK folder anywhere you like and double-click NeuroIK.bat.
That is the whole installation.
On the first run it installs everything NeuroIK needs and then opens the app. Every run after that skips straight to opening the app.
python desktop.py --install-shortcut
once. Afterwards you can start NeuroIK from the Desktop icon instead of the batch file — no console,
just the app.
Closing the app window shuts everything down; nothing keeps running in the background.
2.3 Where files are stored
Everything the app produces lives under a single data/ folder:
NeuroIK/
└── data/
    ├── datasets/   # generated CSVs
    ├── models/     # training checkpoints (best_model.pt)
    ├── exports/    # exported models, one subfolder per format
    └── projects/   # project state (JSON)
You can additionally mirror datasets and exports to a folder of your choosing — see Project Management.
2.4 A portable build
NeuroIK can be packaged into a folder that runs on any Windows machine with no Python installed — copy it to a USB stick and go.
python build_exe.py --venv buildenv\Scripts\python.exe --zipThe result is dist/NeuroIK/; run NeuroIK.exe inside it. Your projects are
written to a data/ folder created beside the executable, so the whole folder
stays self-contained and moves with your work.
Full details, including what to do if it will not start, are in
docs/PORTABLE-BUILD.md.
2.5 First run
NeuroIK opens on the Projects screen with no projects yet. Name a project, click Create Project, and you land on Robot Selection — step 1 of the workflow numbered in the sidebar.
3Robot Selection & Configuration
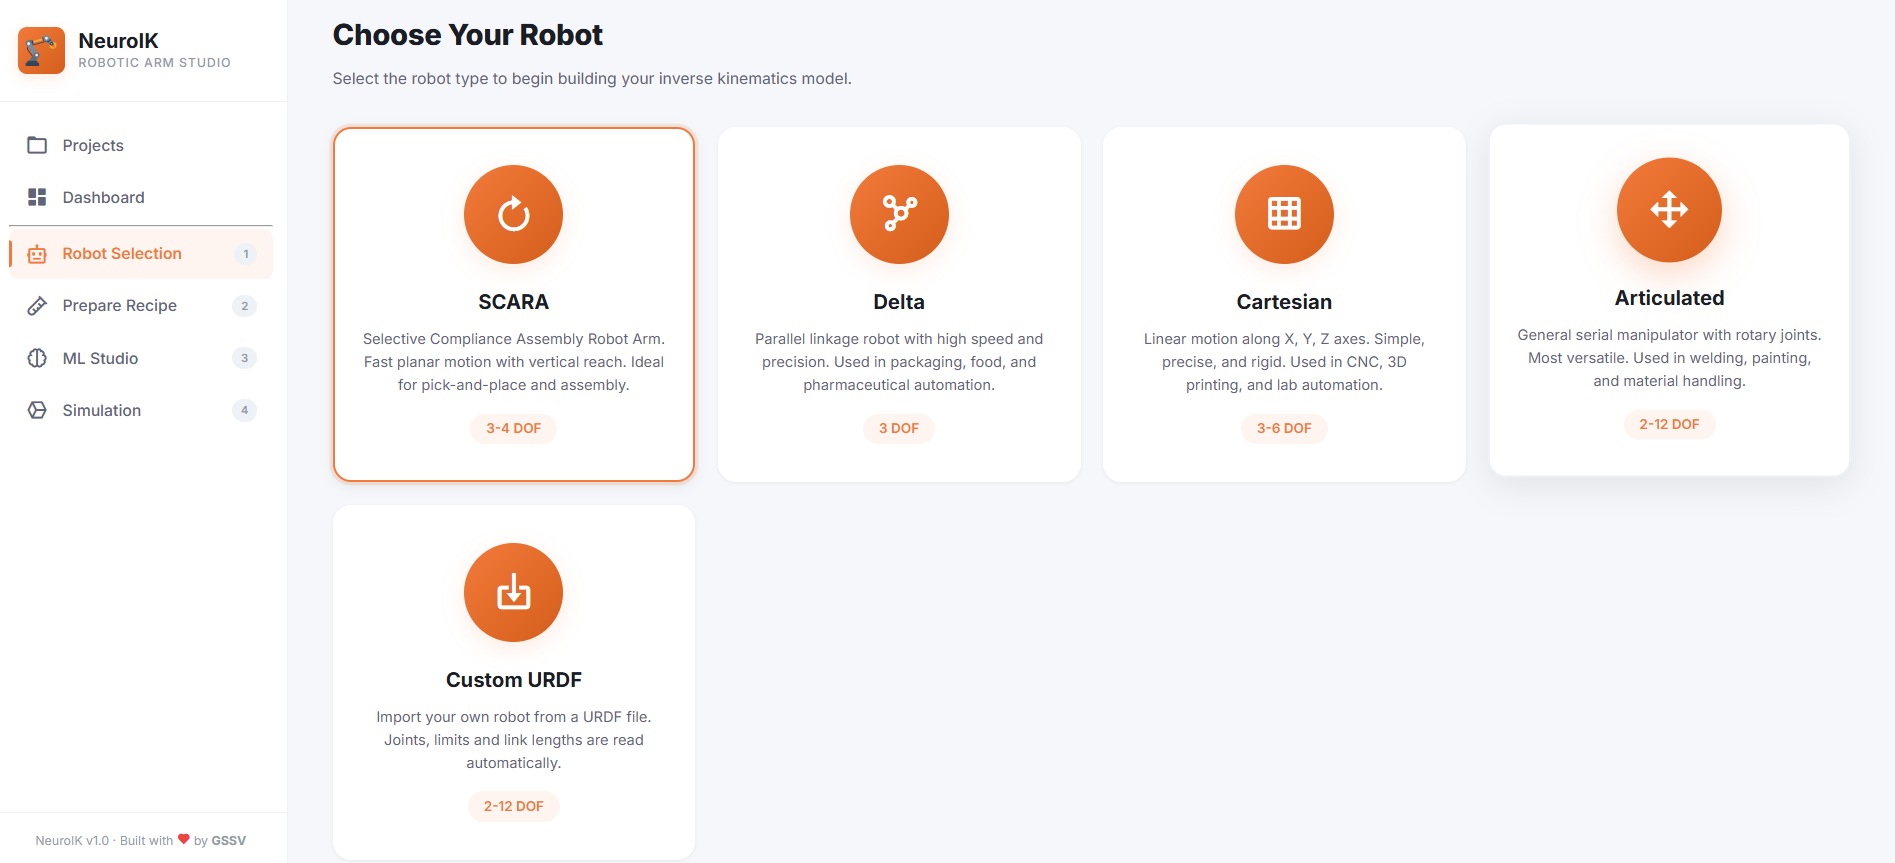
3.1 Available robot types
| Type | DOF | Description | Best for |
|---|---|---|---|
| SCARA | 3–4 | Selective Compliance Assembly Robot Arm — fast planar motion with vertical reach | Pick-and-place, assembly, PCB manufacturing |
| Delta | 3 (fixed) | Parallel linkage — three arms 120° apart | Packaging, food, pharma, high-speed sorting |
| Cartesian | 3–6 | Linear X/Y/Z travel, optional roll/pitch/yaw wrist | CNC, 3D printing, lab automation, gantries |
| Articulated | 2–12 | Serial manipulator with rotary joints — the most versatile | Welding, painting, material handling |
| Custom URDF | 2–12 | Import your own robot from a .urdf/.xacro file — exact chain + your CAD meshes | Real hardware you already have a description for |
SCARA
Two revolute joints sweep in a horizontal plane, a prismatic Z axis mounted at the elbow provides vertical travel, and an optional 4th revolute wrist spins the tool. IK: closed-form analytical. Parameters: link lengths L1/L2 (m), Z travel range, optional wrist limits.
Delta
Three arms mounted 120° apart drive a floating platform; the robot hangs from its base and reaches
below it, so its Z workspace is negative.
IK: trilateration.
Parameters: exactly four —
[R_base, R_platform, L_upper, L_lower].
Cartesian
Three prismatic axes map 1:1 onto X/Y/Z, with an optional wrist. IK: direct mapping — no iteration needed. Parameters: travel range per axis.
Articulated
An anthropomorphic chain: a base yaw joint and column, parallel-pitch shoulder and elbow, and — at 6+ DOF — a spherical wrist (roll · pitch · roll) whose axes meet at a single point. DH parameters are generated automatically from your link lengths, and the home pose stands straight up along +Z. IK: numerical damped least-squares with 12 multi-start restarts.
Custom URDF
Instead of describing a robot by hand, import one. Click Custom URDF and enter a
path — either the .urdf/.xacro file, or the folder containing
it (recommended: mesh references resolve relative to that folder).
NeuroIK walks the real chain and uses each joint's true origin (xyz + rpy) and
axis, so imported robots run on a dedicated exact-kinematics engine —
not the auto-generated DH approximation used by the generic Articulated type. That exactness is what
lets your CAD line up with the joint motion.
IK: numerical damped least-squares with multi-start restarts.
What gets imported
- Joint count, types and limits — revolute limits convert from radians to
degrees; prismatic stays in metres.
continuousjoints and joints with no<limit>default to ±180° (you'll get a warning). - Link lengths — the distance from each actuated joint to the next, with any
intervening
fixedjoints folded in. - Visual geometry — rendered in the Live Preview and Simulation.
Mesh formats
STL, DAE and OBJ are rendered, as are URDF
<box>/<cylinder>/<sphere> primitives.
Paths are resolved through package://, file://, absolute and relative
forms — and finally by filename anywhere under the folder, which covers descriptions whose
package:// paths don't match the shipped layout.
Xacro support
.xacro files are expanded internally — no ROS install required:
<xacro:property>, ${...} arithmetic, <xacro:include>
and <xacro:if>/<xacro:unless>. Expressions are evaluated over a
restricted AST, never eval().
<xacro:macro> is not supported.
Expanding macros correctly is a large job, and a partial implementation would silently produce a
wrong robot. Pre-expand instead:
xacro robot.xacro -o robot.urdf, then import the generated robot.urdf.Branches and mimic joints
The whole tree is drawn, not just the actuated chain — so side branches like a gripper's second finger appear. The DOF, however, come from the longest actuated chain.
A <mimic> joint is driven by another joint, so it is not an independent
DOF: it's excluded from the joint count (and from the network's outputs) but follows its source in
3D via value = multiplier × source + offset.
Editing after import
Joint limits and link lengths stay editable — narrowing limits is a legitimate way to shape the dataset, and changing a link length rescales the spacing to the next joint (kinematics and the 3D view stay in step). The DOF count and joint types are locked by the file: the engine rejects a joint count that disagrees with the parsed chain, and flipping a type would corrupt the degrees/metres conversion.
Only some of my meshes appear
NeuroIK draws the links the URDF declares. If a folder ships 13 STLs but the description
references 7, you'll see 7 — the rest are spare parts no link points at. Add
<link>/<joint> entries to use them.
3.2 Recipe Builder
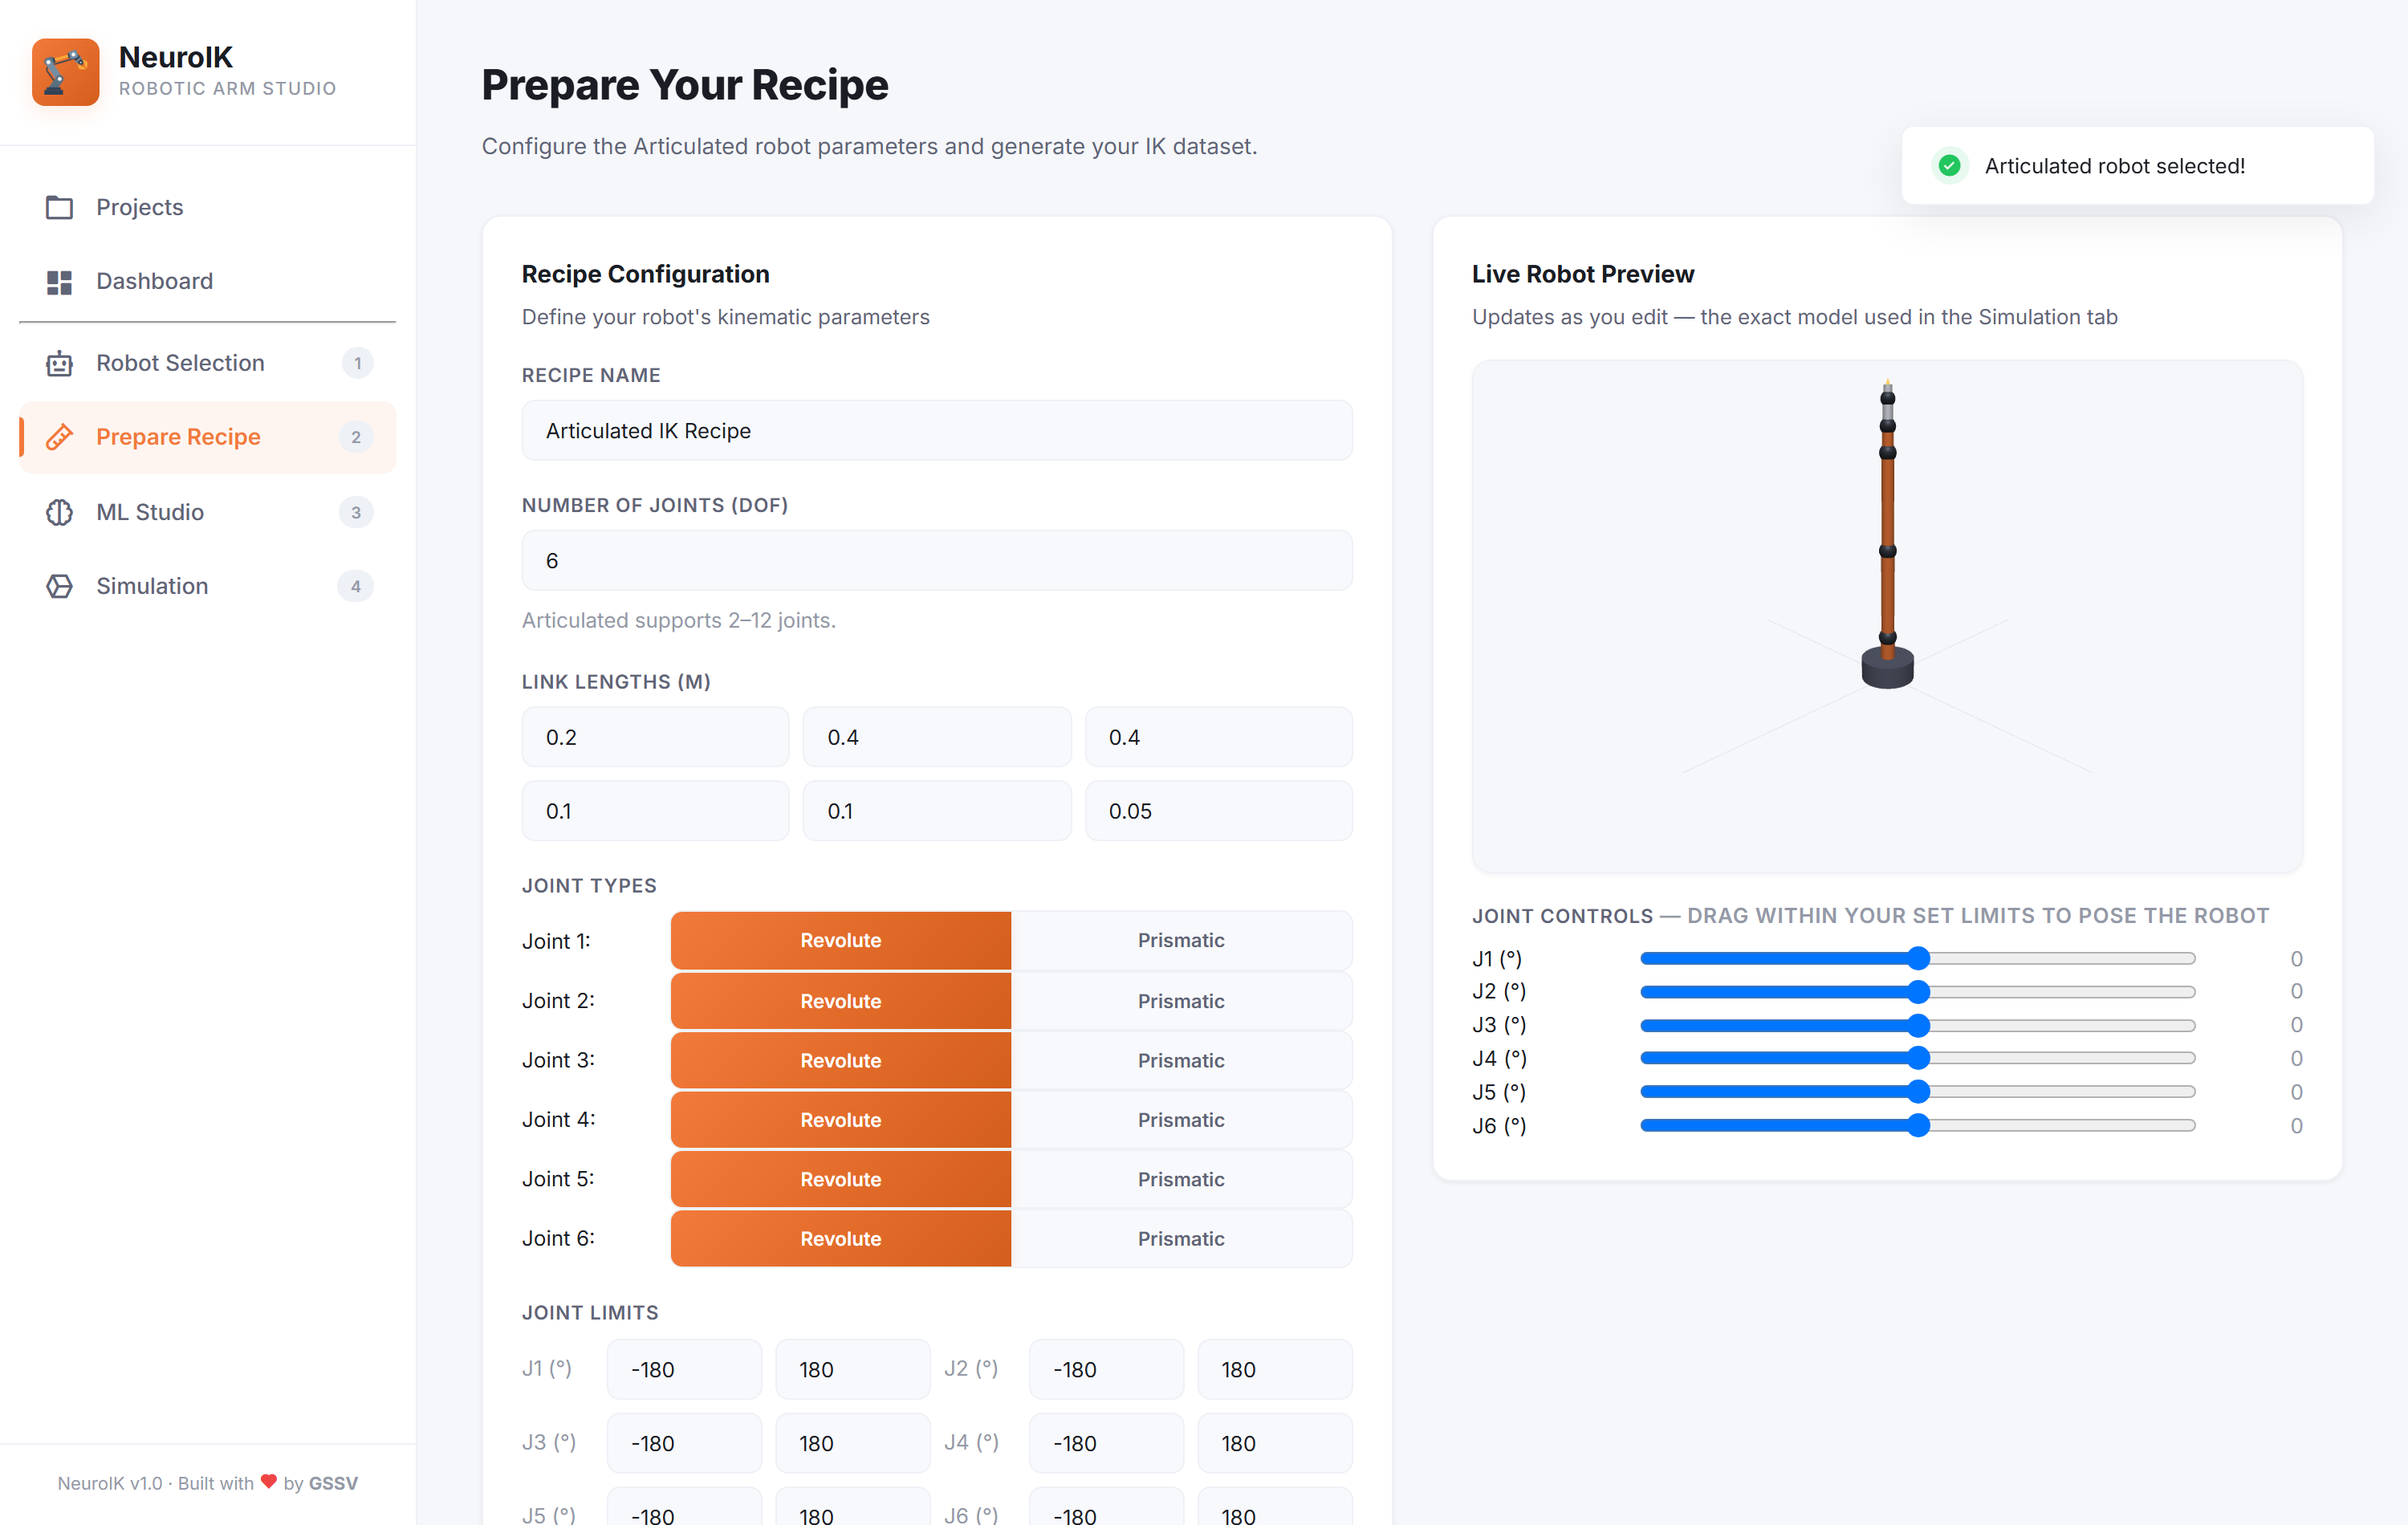
The Recipe Builder is where a robot becomes concrete:
- Link lengths — each joint's link, in metres.
- Joint type — revolute (degrees) or prismatic (metres).
- Joint limits — min/max per joint. These bound the sampling, so they define the reachable workspace.
- Dataset size — 10K, 100K or 1M samples.
- Name — saved with the project.
Live Robot Preview
The preview renders through the same code as the Simulation tab, so what you see here is what you'll simulate. It updates as you type — no need to regenerate a dataset first.
- Joint Controls — one slider per joint, bounded to the limits you set, to pose the arm and sanity-check its reach before committing to a dataset.
- SCARA J3 — the vertical prismatic travel is derived from the 3rd link length
(the quill descends from
0to−L3), so those limit fields are read-only and follow the link. - Imported URDFs are framed automatically, since they arrive at any scale.
{
  "robot_type": "articulated",
  "num_joints": 6,
  "link_lengths": [0.2, 0.4, 0.4, 0.1, 0.1, 0.05],
  "joints": [
    { "joint_type": "revolute", "min_limit": -180, "max_limit": 180 }
  ],
  "recipe_name": "My Robot",
  "dataset_size": 100000
}4Dataset Generation
Click Generate Dataset in the Recipe Builder. Generation runs in the background with a live progress bar; the UI stays responsive.
Output format
A single CSV — one row per sample:
x,y,z,roll,pitch,yaw,joint_1,joint_2,...,joint_N| Columns | Meaning | Units |
|---|---|---|
x, y, z | End-effector position | metres |
roll, pitch, yaw | End-effector orientation | radians |
joint_1 … joint_N | Joint values that produce that pose | degrees (revolute) / metres (prismatic) |
Workspace analytics
After generation NeuroIK analyses the reachable volume (x/y/z ranges) and uses it to calibrate the Simulation sliders — so default targets land where the robot can actually go. This is why a Delta's Z slider is negative: it reaches below its base.
5ML Studio
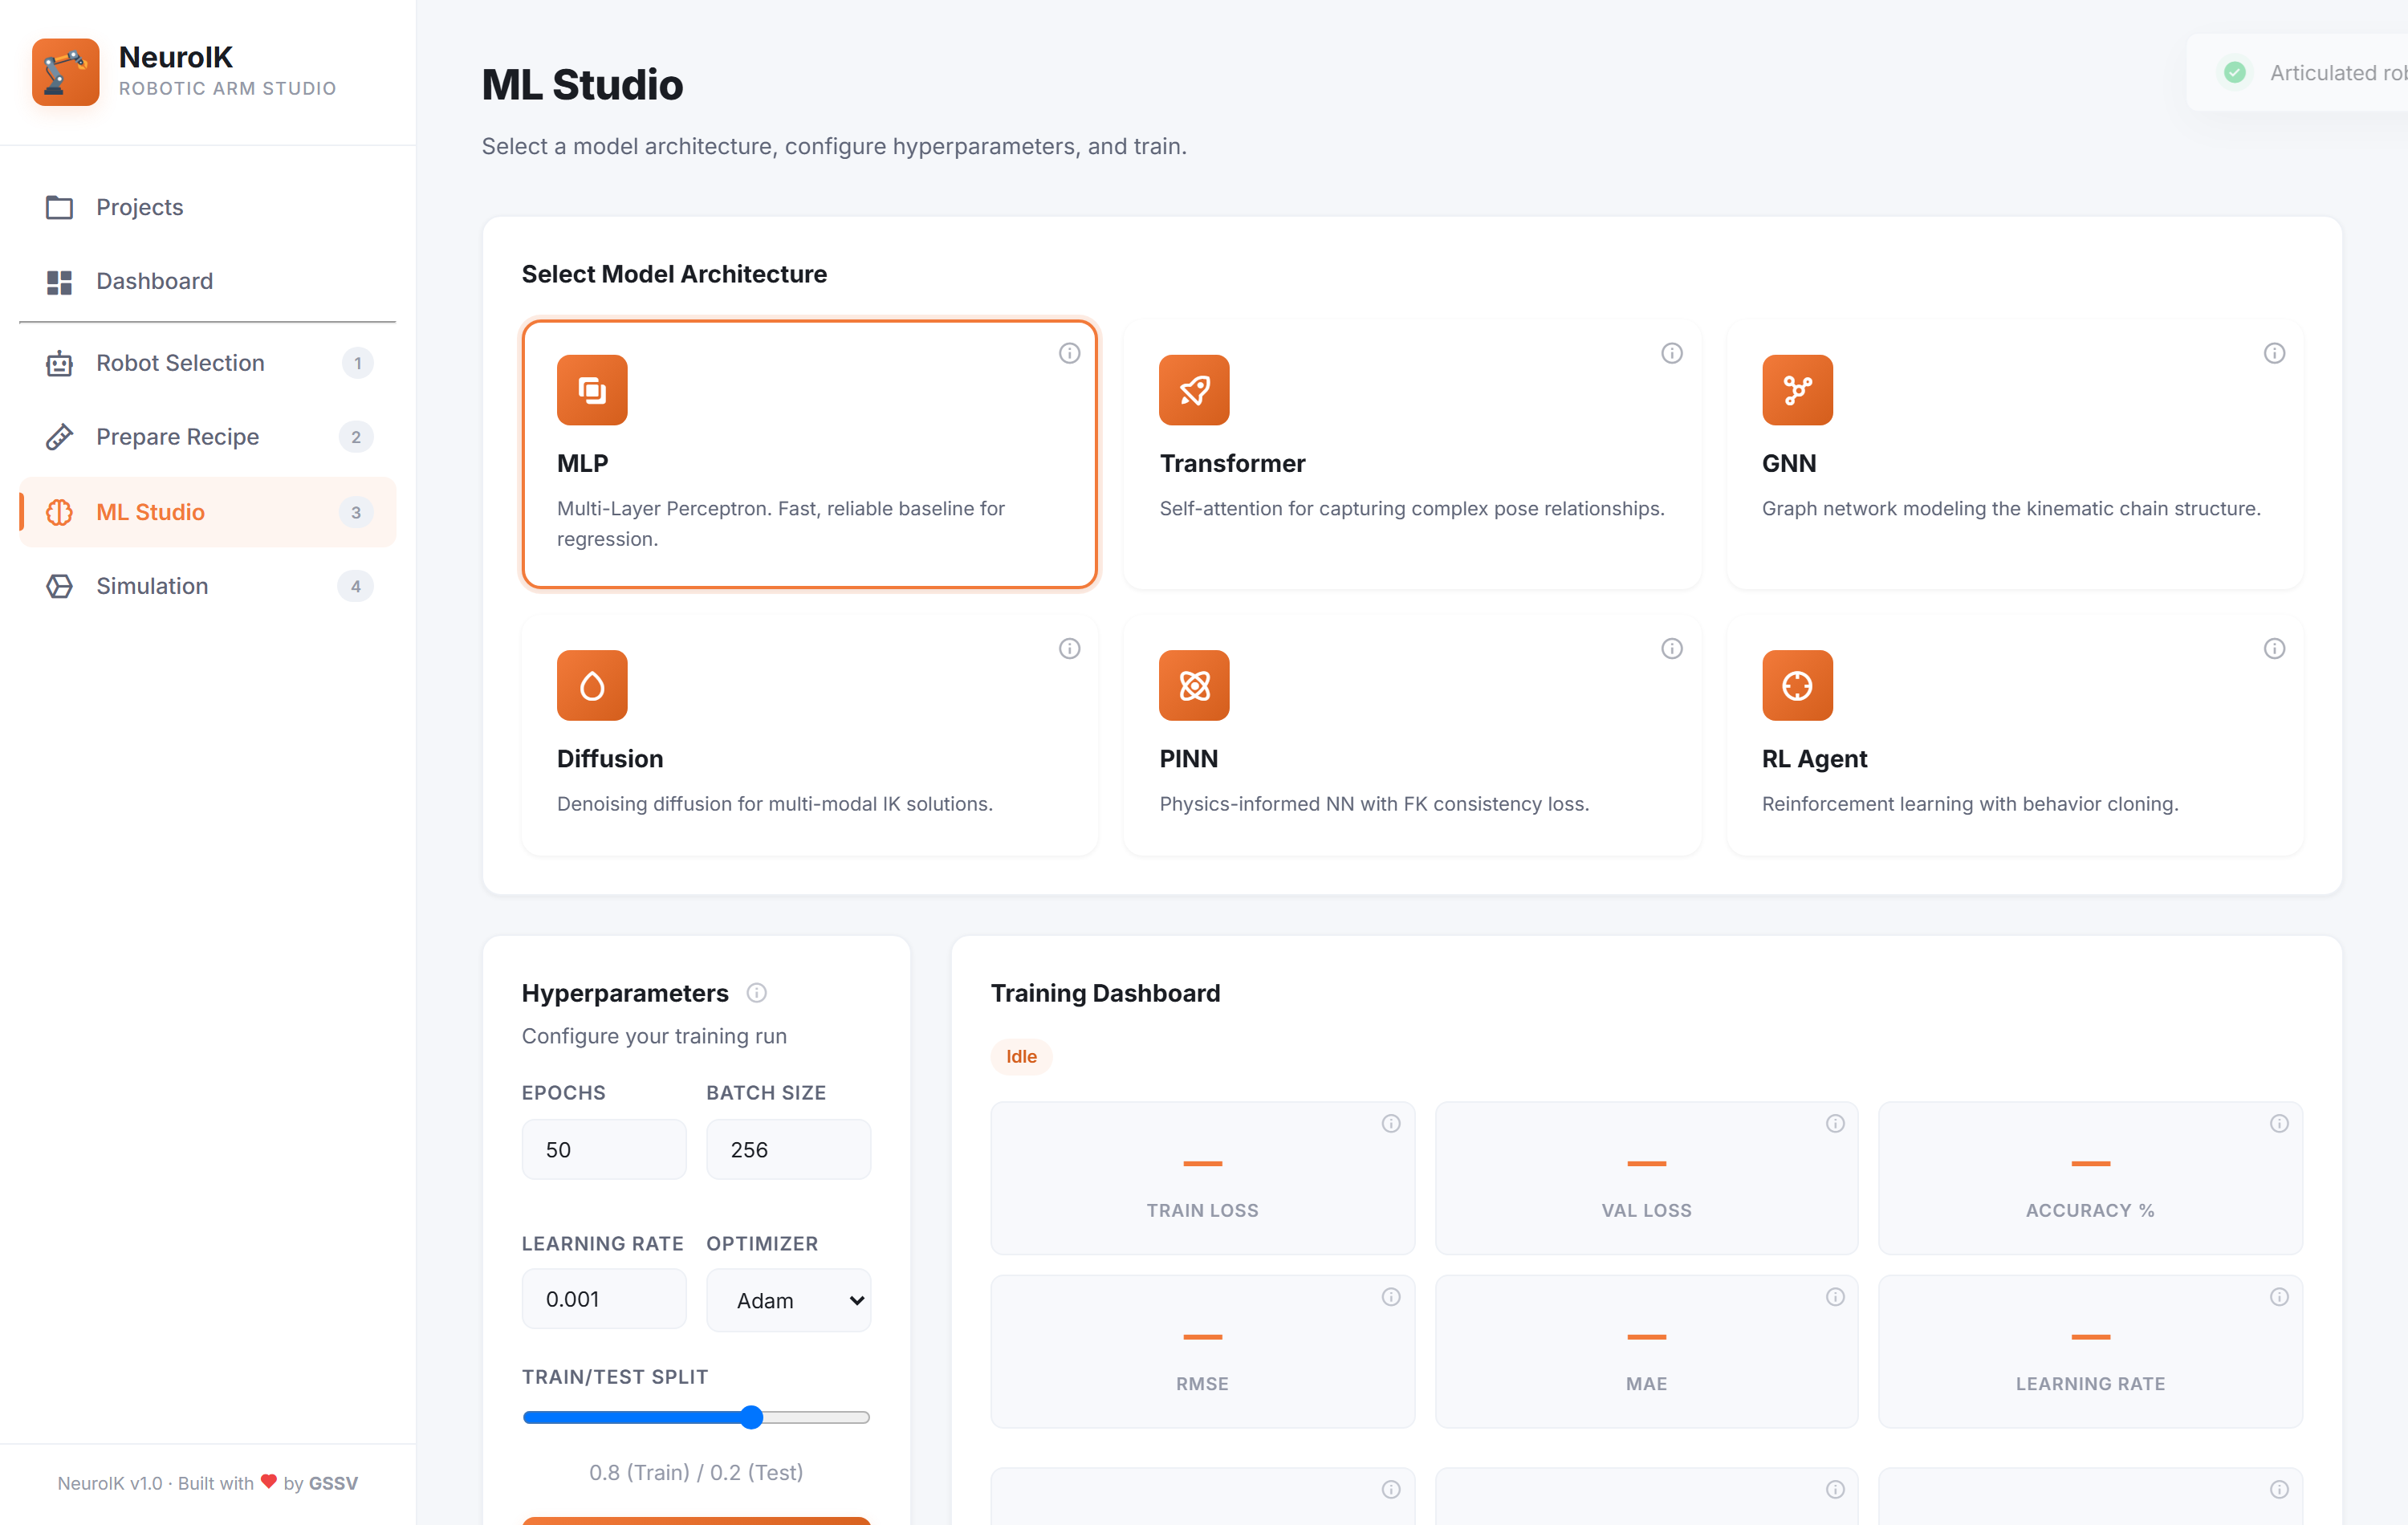
GPU or CPU — chosen automatically
NeuroIK picks the training device at run time: CUDA if a usable GPU is present, CPU otherwise. There is nothing to configure and nothing breaks without a GPU. A banner at the top of ML Studio always states which device the next run will use.
torch wheel is CPU-only, so a plain
pip install torch gives you a build where torch.cuda.is_available() is
permanently False — the GPU is never touched, however capable it is. Check with:
python -c "import torch; print(torch.__version__, torch.cuda.is_available())"A build ending in +cpu (e.g. 2.2.2+cpu) is the CPU-only wheel. Install
the CUDA build instead:
pip install --force-reinstall torch --index-url https://download.pytorch.org/whl/cu121NeuroIK.bat now does this for you on first install: it looks for
nvidia-smi and pulls the CUDA wheel when a GPU is present.
ML Studio detects this exact situation — GPU present, torch unable to use it — by asking the driver
via nvidia-smi rather than trusting torch, and shows the fix inline. The
/api/system endpoint reports the same thing:
{
  "torch_version": "2.2.2+cpu",
  "torch_cuda_build": null,
  "cuda_available": false,
  "device": "cpu",
  "gpu_name": "NVIDIA GeForce MX550",
  "gpu_present_but_unusable": true,
  "gpu_hint": "... install a CUDA build to use the GPU"
}| Situation | Device used | What ML Studio shows |
|---|---|---|
| CUDA build + NVIDIA GPU | cuda | Green — "Training on GPU", card name and VRAM |
| No NVIDIA GPU | cpu | Blue — "Training on CPU", core count |
| GPU present, CPU-only torch | cpu | Amber — the card name plus the exact install command |
Training configuration
| Setting | Range | Default | Notes |
|---|---|---|---|
| Epochs | 1–1000 | 50 | Full passes over the data |
| Batch size | 16–4096 | 256 | Larger = smoother, more memory |
| Learning rate | 0.0001–1.0 | 0.001 | Auto-reduced on plateau |
| Optimizer | Adam · AdamW · SGD · RMSProp | Adam/AdamW are robust defaults | |
| Train/test split | 50–95% | 80% | Held-out validation share |
Recommended starting point for 100K samples
| Epochs | Batch | LR | Optimizer | Split |
|---|---|---|---|---|
| 60 | 1024 | 0.001 | Adam | 0.85 |
Live metrics
Training streams in real time: train/val loss, accuracy %, RMSE, MAE, learning rate, elapsed, ETA, CPU/GPU usage — plus two charts.
| Metric | Meaning | Target for a good model |
|---|---|---|
| Accuracy % | Share of validation targets reached within tolerance (checked by FK) | ≥ 90% strong, ≥ 95% excellent |
| RMSE | Root-mean-square end-effector position error | < 0.02 m |
| MAE | Typical miss distance | < 0.01 m |
| Val loss | Error on held-out data | Tracks train loss; a widening gap = overfitting |
The two charts
- Loss curves — train vs validation per epoch. Both should fall then flatten.
- Target vs Predicted — the pose the model actually reaches (FK on its predicted
joints) against the requested target, for x/y/z. A perfect model puts every point on the dashed
y = xline; scatter away from the diagonal means the arm misses.
5.1 Architectures
MLP — Multi-Layer Perceptron
Structure: 6 → 256 → 512 → 512 → 256 → 128 → N, GELU activations, LayerNorm, dropout.
Data: 10K–100K · Best for: every robot type, as a fast baseline
- Pros — fastest to train, lowest memory, excellent on SCARA/Cartesian/Delta. The only architecture that exports to a complete TinyML header.
- Cons — no built-in mechanism for multi-modal solutions; can plateau on long articulated chains.
Transformer
Structure: encoder over 6 learned token embeddings, multi-head self-attention, LayerNorm, learned positional encoding.
Data: 100K+ · Best for: articulated / SCARA with long-range coupling
- Pros — attention captures dependencies between pose dimensions and joints.
- Cons — more memory, slower, hungrier for data.
GNN — Graph Neural Network
Structure: message passing over the kinematic chain — joints are nodes, links are edges; 3 rounds of learned node/edge updates.
Data: 50K+ · Best for: articulated arms
- Pros — the network encodes chain topology explicitly.
- Cons — overkill when the structure is trivial (Cartesian).
Diffusion — DDPM
Structure: denoises random joint vectors conditioned on the target pose; cosine schedule, FiLM conditioning. At inference it samples 16 candidates and keeps whichever FK says lands closest.
Data: 100K+ · Best for: poses with several valid solutions
- Pros — handles multi-modal IK naturally; strongest in ambiguous cases.
- Cons — ~16× slower inference, heaviest to train.
PINN — Physics-Informed
Structure: MLP backbone plus an FK-consistency loss penalising predictions whose FK misses the target.
Data: 10K–50K · Best for: small datasets
- Pros — best sample efficiency; physically consistent.
- Cons — dual objective can be unstable if the FK weight is off.
RL Agent
Structure: actor-critic (PPO-style) with behaviour-cloning pretraining; reward is pose error.
Data: 100K+ · Best for: research and experimentation
- Pros — can discover strategies absent from the data.
- Cons — needs reward tuning; non-deterministic outputs.
5.2 Choosing a model
New to NeuroIK?
  └─ Start with MLP — fast baseline, works for everything
     └─ Accuracy acceptable? ──► Done. Use MLP.
        └─ No ─► Robot has 6+ joints?
           ├─ Yes ─► Transformer or GNN
           └─ No  ─► Diffusion (multi-modal) or PINN (small data)
└─ Still not enough? ─► RL Agent6Simulation Studio
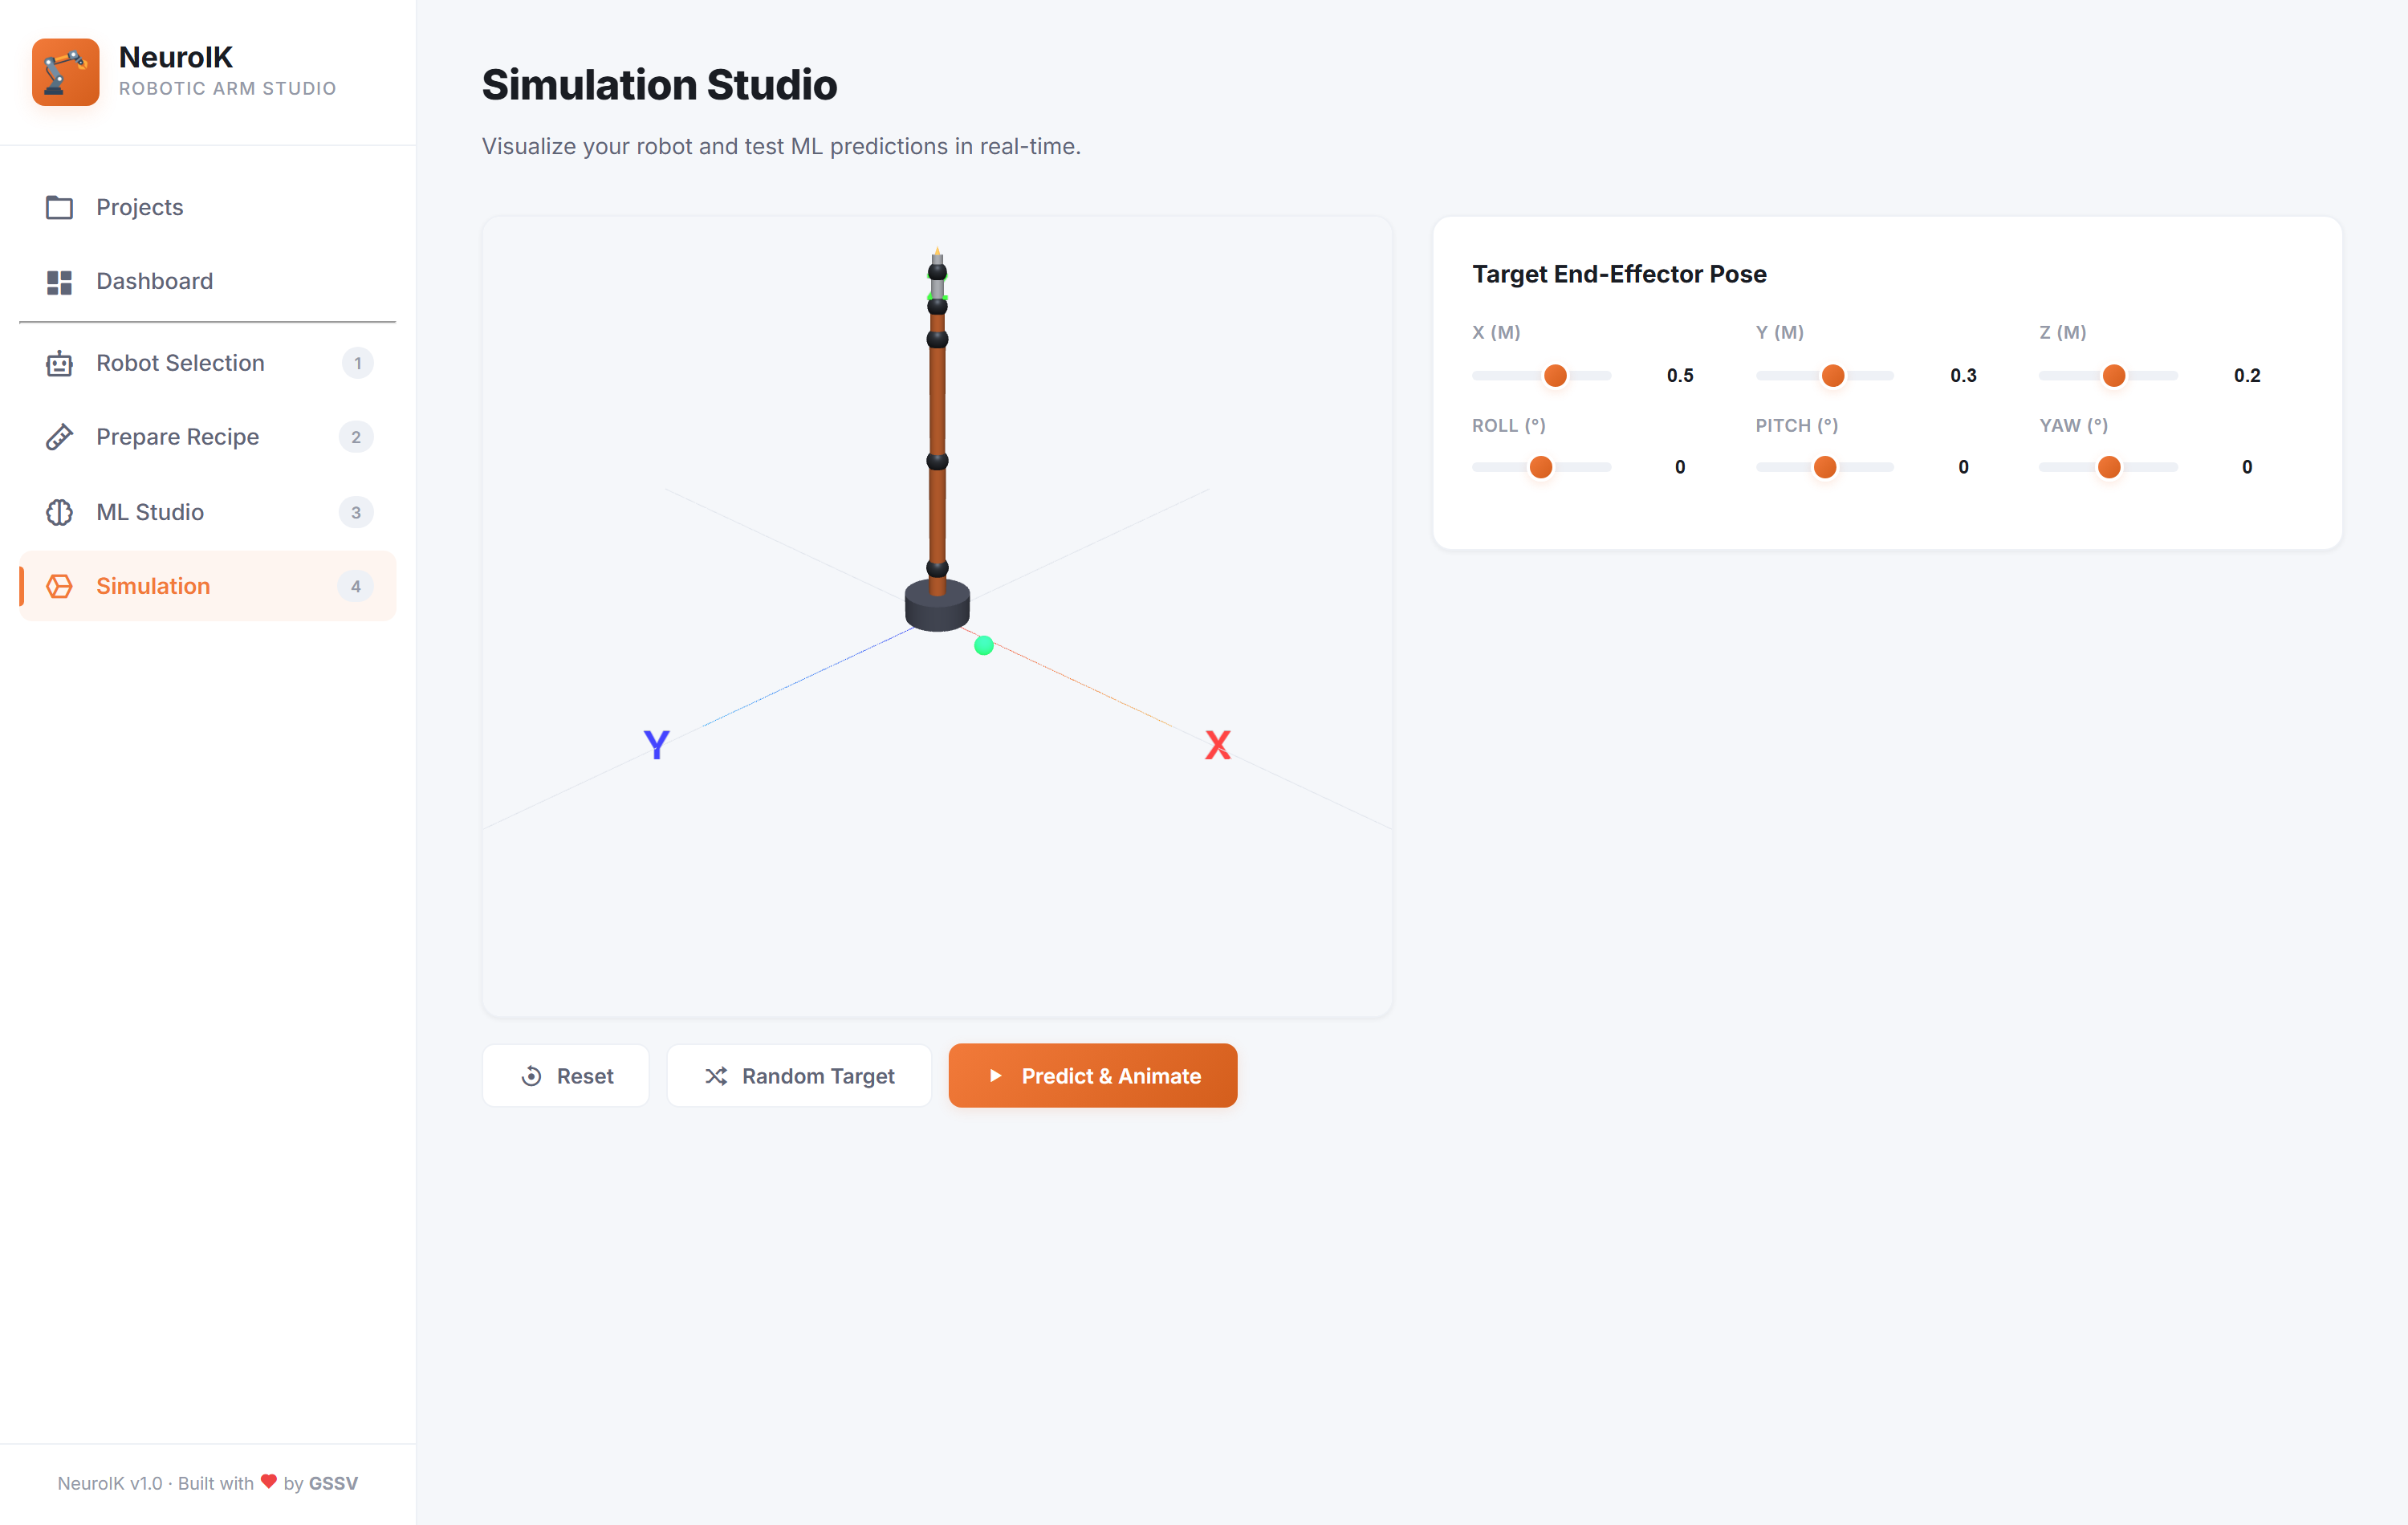
6.1 The 3D viewport
- Controls — drag to orbit, scroll to zoom, right-drag to pan.
- Real scale — everything is drawn in metres, matching the recipe.
- Markers — a green sphere marks the target; a blue sphere marks where the model actually put the end-effector.
- Collisions — for articulated arms, non-adjacent links are AABB-checked; colliding pairs turn red.
6.2 Running inference
Set the target with six controls — X/Y/Z in metres, roll/pitch/yaw in degrees — then press Predict & Animate. Each slider has a number box beside it for exact entry; the box is authoritative, so it also accepts values outside the slider's range when you need a target the slider can't reach.
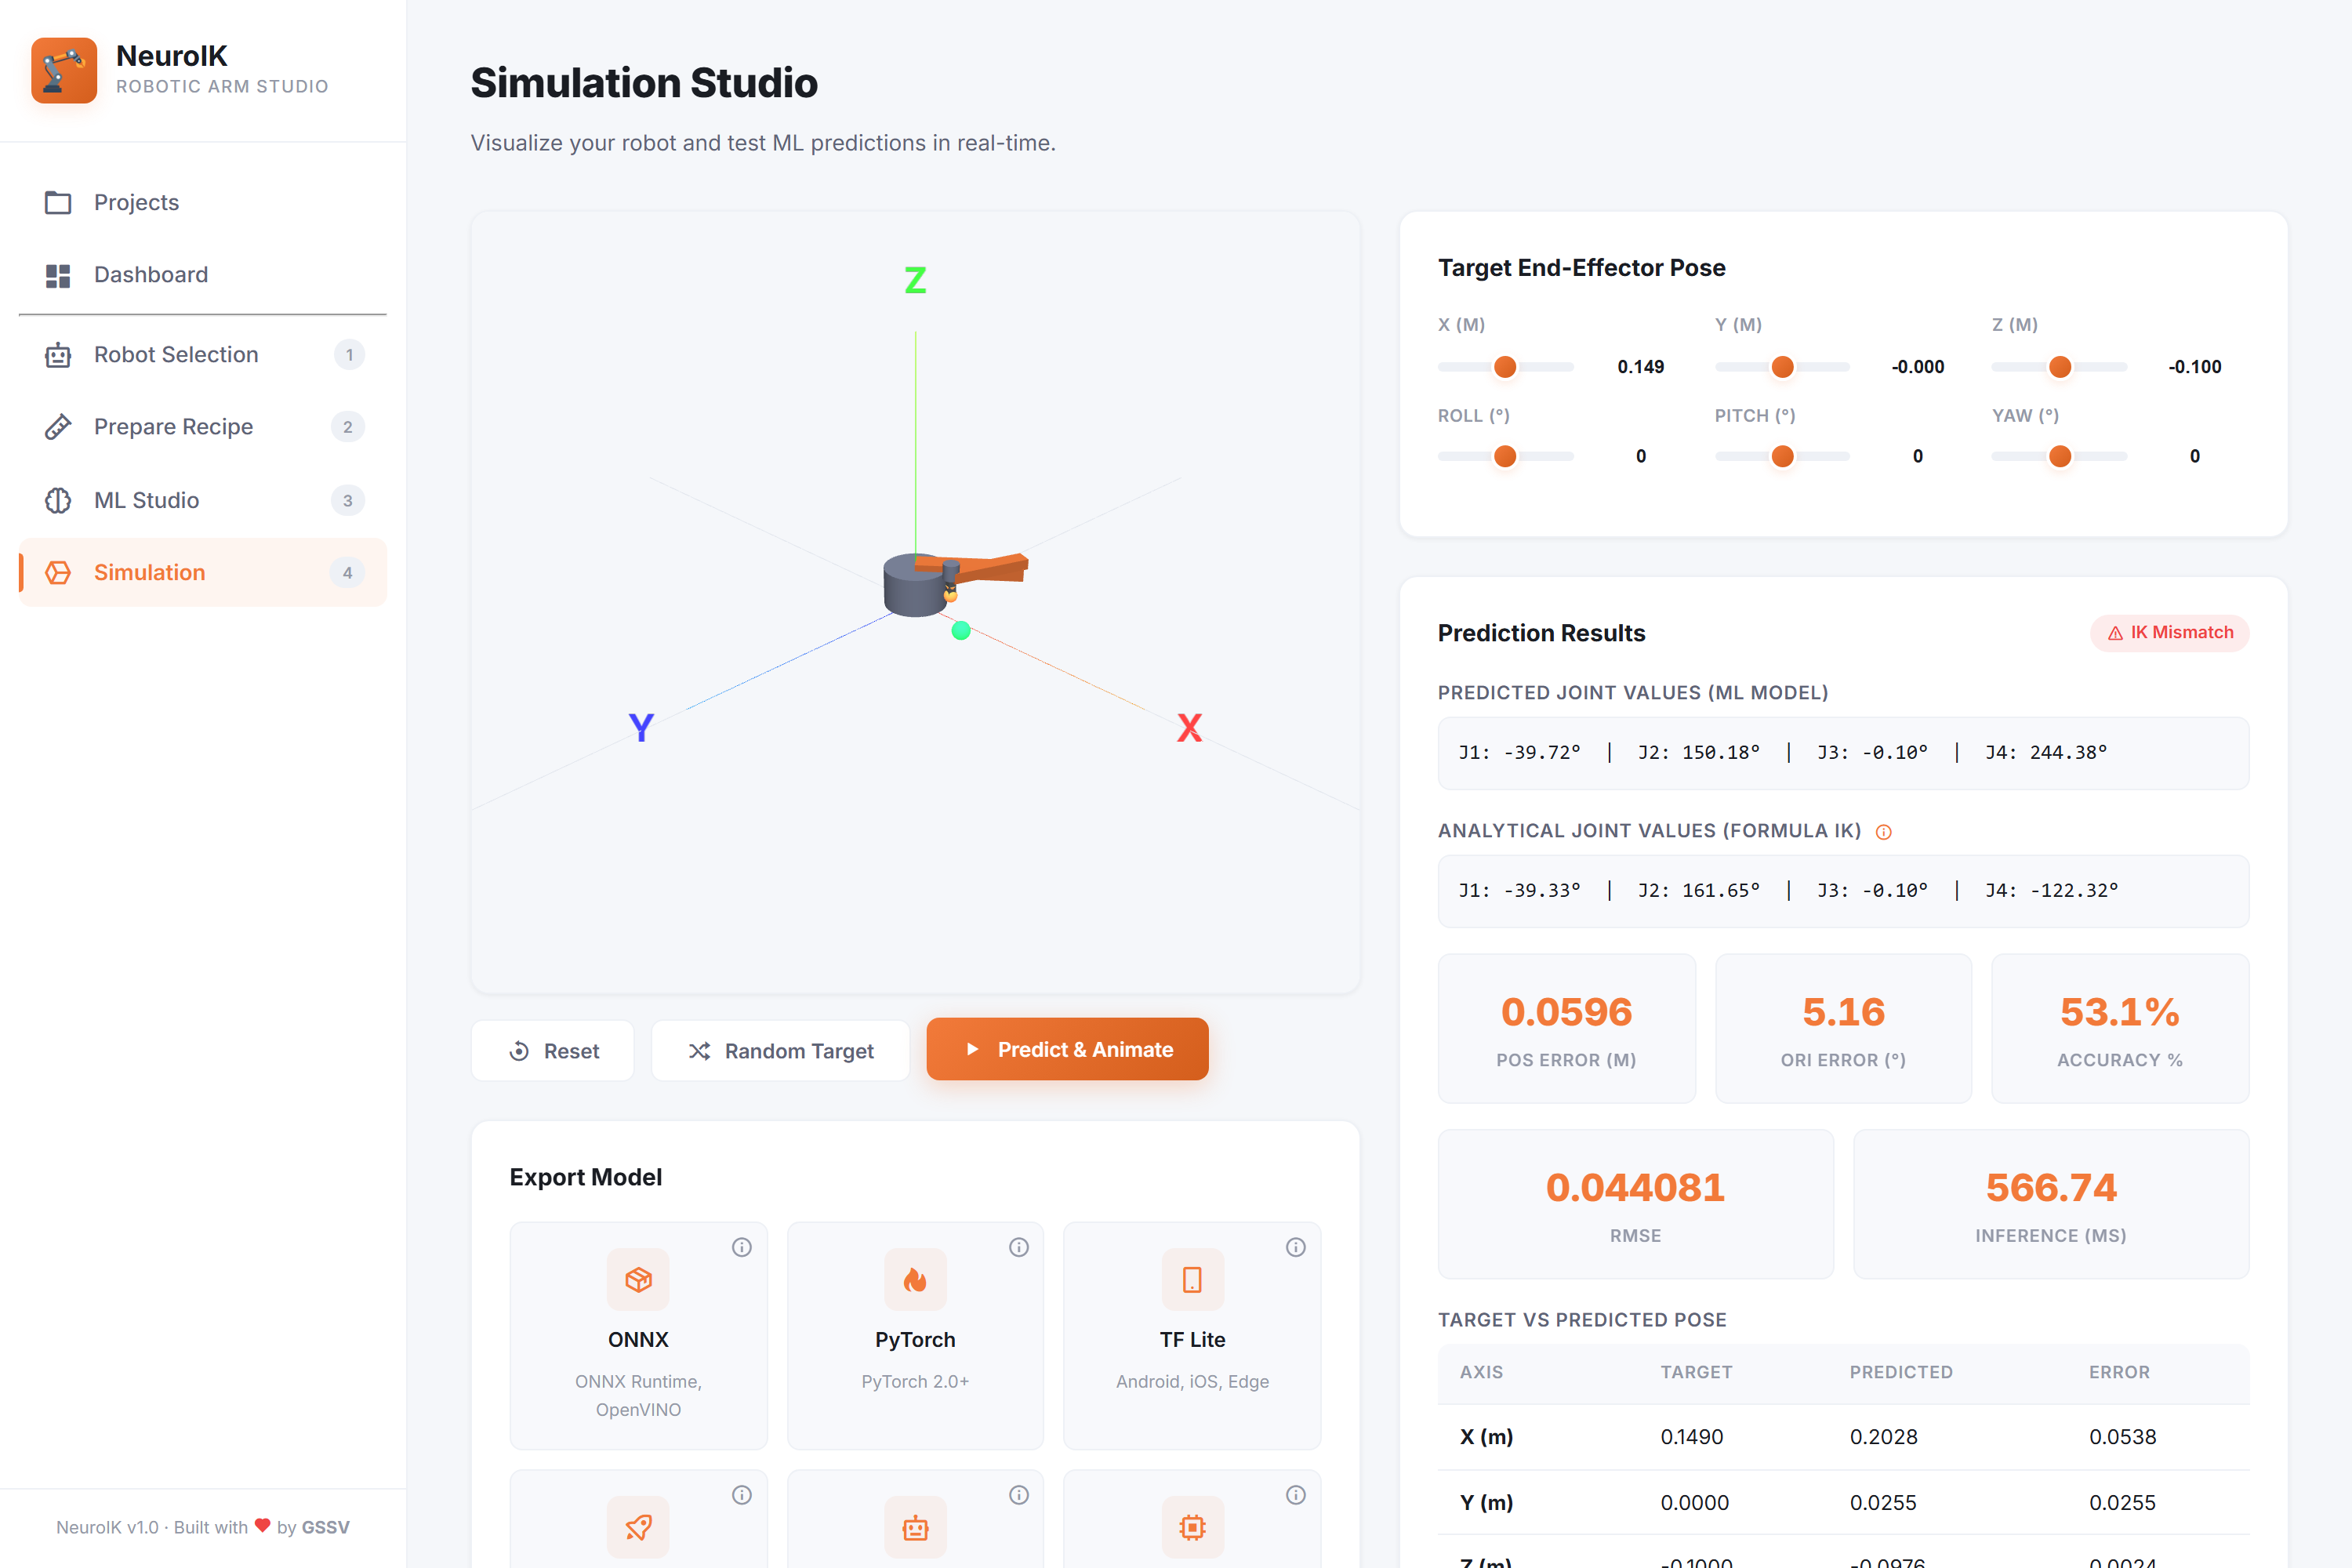
The results panel reports:
| Field | Meaning |
|---|---|
| Predicted joint values | Raw output of the trained network |
| Analytical joint values | Classical solver's answer, for comparison |
| IK Match badge | Green when position error < 2 cm and orientation error < 5° |
| Pos / Ori error | How far the end-effector landed from the target (m / °) |
| Inference time | Model latency in ms |
The ⓘ icon next to Analytical Joint Values opens the actual IK formulas for the loaded robot — the closed-form SCARA solution, the Delta per-arm trilateration, the Cartesian direct mapping, or the damped-least-squares iteration used for Articulated and imported URDF robots.
6.3 Random target
Random Target gives a guaranteed-reachable pose. If the project has a generated dataset it returns an actual row from it — the exact distribution the model was trained on, which is the fairest way to spot-check accuracy. Otherwise it samples random joints within your limits and runs FK. Either way the pose is reachable by construction, so a blind bounding-box guess never lands outside the workspace.
6.4 Export panel
After a successful prediction, the Export Model panel appears beneath the viewport with all ten targets. Hover any ⓘ for a one-line summary of what a format is for, and see §7 for integration code. Formats that cannot represent the current architecture report a clear message instead of exporting — check the support matrix first.
7Exporting Models
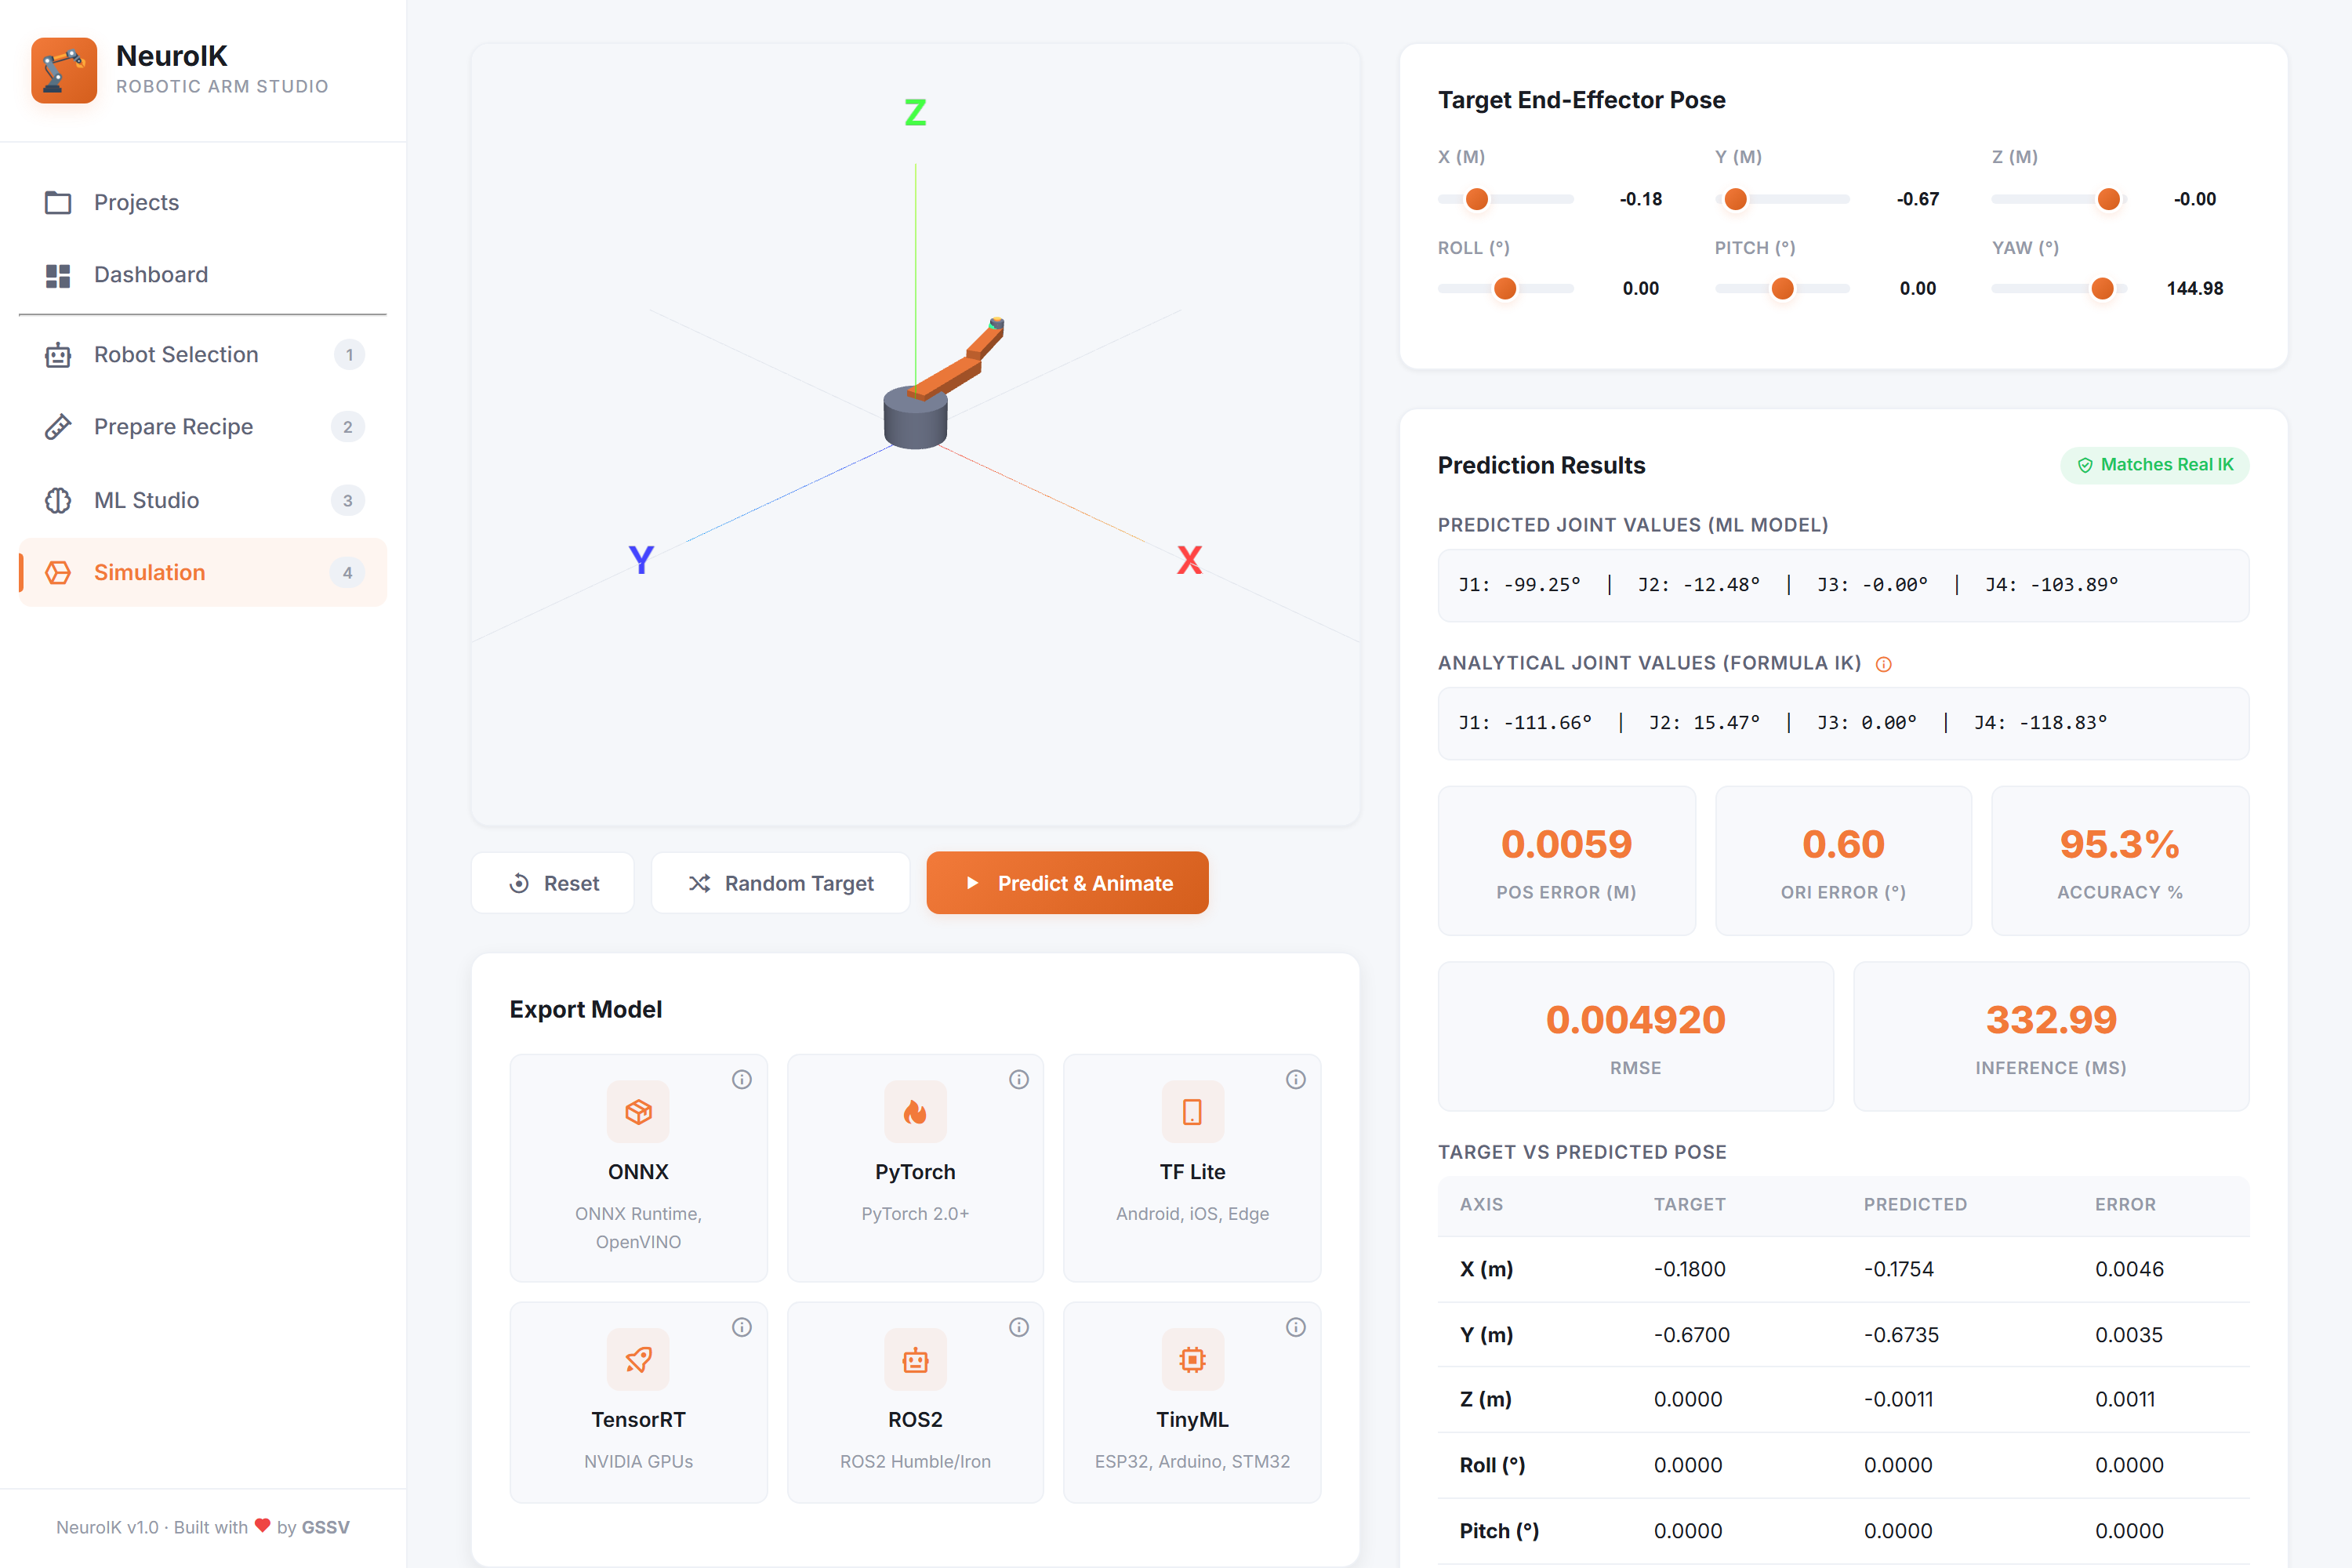
Every export reports format_name, file_size_mb, param_count,
supported_runtime and validation_passed, and is written to
data/exports/<format>/.
7.1 Normalization is baked in
NeuroIK trains on normalized values, but you never have to think about that. Every export folds the normalization constants into the model itself: feed a raw pose in metres and radians, read real joint units — degrees for revolute joints, metres for prismatic — straight back out.
joints = model(pose) // that's the whole contractEach export still ships a model_meta.json beside it, both as
documentation and so tooling can read the I/O layout:
{
  "model_type": "mlp",
  "input_dim": 6,
  "output_dim": 4,
  "pose_order": ["x","y","z","roll","pitch","yaw"],
  "pose_units": "x/y/z in metres, roll/pitch/yaw in radians",
  "joint_units": "degrees for revolute joints, metres for prismatic",
  "normalization": { "x_mean": [...], "x_std": [...],
                      "y_mean": [...], "y_std": [...] },
  "normalization_baked_in": true,
  "usage": "joints = model(pose) - normalization is built into the graph..."
}(pose - x_mean) / x_std before calling a baked model normalizes the input
twice and produces confident-looking nonsense. Always check
normalization_baked_in — it is true for every format except one.
ik_node.py applies the constants explicitly in predict(), so its
model_meta.json reports "normalization_baked_in": false. The node handles
it for you; you only need to care if you load best_model.pt yourself.
Dense layers — an affine op folded into an adjacent
affine layer is mathematically identical and costs nothing at inference. TinyML and the native DLL
emit the arithmetic directly into their generated C. Every one is verified against PyTorch
numerically at export time, so a mis-folded constant fails the export instead of shipping.
7.2 Which formats work with which architecture
Not every architecture can become every format. Formats that rebuild the network layer-by-layer
(TF Lite, Keras H5, native DLL) need a plain feed-forward stack; diffusion, GNN, transformer and RL
keep their real logic inside forward(), so those combinations are
refused at export time rather than silently producing a model that has the right
output shape but computes the wrong function.
| Architecture | onnx | pytorch | torchscript | tensorrt | tflite | h5 | ros2 | tinyml | dll | coreml |
|---|---|---|---|---|---|---|---|---|---|---|
| mlp | OK | OK | OK | OK | OK | OK | OK | OK | no-cc | OK |
| pinn | OK | OK | OK | OK | OK | OK | OK | OK | no-cc | OK |
| transformer | OK | OK | OK | OK | refused | refused | OK | OK | refused | fails |
| gnn | OK | OK | OK | OK | refused | refused | OK | OK | refused | OK |
| diffusion | OK | OK | OK | OK | refused | refused | OK | OK | refused | OK |
| rl | OK | OK | OK | OK | refused | refused | OK | OK | refused | OK |
OK exports and passes validation · refused deliberately blocked with an explanatory message · no-cc works, but needs a C compiler installed (the C sources and a build script are written either way) · fails conversion is not possible — see the format's notes.
ik_forward() is only
generated for plain feed-forward models. Others get their raw weight arrays and no forward pass.
See 7.10.
7.3 ONNX
File: model.onnx + model_meta.json ·
Opset: 17, dynamic batch ·
Runtime: ONNX Runtime, OpenVINO ·
I/O: pose float32[B,6] → joints float32[B,N]
#include <onnxruntime_cxx_api.h>
#include <vector>

Ort::Env env(ORT_LOGGING_LEVEL_WARNING, "neuroik");
Ort::Session session(env, "model.onnx", Ort::SessionOptions{});

float pose[6]     = {0.5f, 0.3f, 0.2f, 0.0f, 0.0f, 0.0f};
int64_t shape[2]  = {1, 6};

auto mem   = Ort::MemoryInfo::CreateCpu(OrtArenaAllocator, OrtMemTypeDefault);
auto input = Ort::Value::CreateTensor<float>(mem, pose, 6, shape, 2);

const char* in_names[]  = {"pose"};
const char* out_names[] = {"joints"};

auto out = session.Run(Ort::RunOptions{nullptr},
                       in_names, &input, 1, out_names, 1);

float* joints = out[0].GetTensorMutableData<float>();
// joints[0..N-1] are already in real units.
Link against onnxruntime. Ort::Value does not own the buffer, so `pose` must outlive the Run() call.
import numpy as np
import onnxruntime as ort

sess = ort.InferenceSession("model.onnx")

# Raw pose: [x, y, z, roll, pitch, yaw] in metres and radians.
# Normalization is inside the graph -- do not apply it yourself.
pose = np.array([[0.5, 0.3, 0.2, 0.0, 0.0, 0.0]], dtype=np.float32)

joints = sess.run(["joints"], {"pose": pose})[0]
print(joints[0])          # degrees (revolute) / metres (prismatic)

# The batch axis is dynamic -- stack rows to solve many poses at once.
many = np.array([[0.5, 0.3, 0.2, 0.0, 0.0, 0.0],
                 [0.4, 0.1, 0.3, 0.0, 0.0, 0.5]], dtype=np.float32)
print(sess.run(["joints"], {"pose": many})[0].shape)   # (2, N)
pip install onnxruntime
using Microsoft.ML.OnnxRuntime;
using Microsoft.ML.OnnxRuntime.Tensors;

using var session = new InferenceSession("model.onnx");

var pose = new DenseTensor<float>(new[] { 1, 6 });
float[] values = { 0.5f, 0.3f, 0.2f, 0.0f, 0.0f, 0.0f };
for (int i = 0; i < 6; i++) pose[0, i] = values[i];

var inputs = new[] { NamedOnnxValue.CreateFromTensor("pose", pose) };
using var results = session.Run(inputs);

var joints = results.First().AsEnumerable<float>().ToArray();
Console.WriteLine(string.Join(", ", joints));
dotnet add package Microsoft.ML.OnnxRuntime
import ai.onnxruntime.*;
import java.util.Collections;

OrtEnvironment env = OrtEnvironment.getEnvironment();
OrtSession session = env.createSession("model.onnx", new OrtSession.SessionOptions());

float[][] pose = {{0.5f, 0.3f, 0.2f, 0.0f, 0.0f, 0.0f}};

try (OnnxTensor input = OnnxTensor.createTensor(env, pose);
     OrtSession.Result result = session.run(Collections.singletonMap("pose", input))) {

    float[][] joints = (float[][]) result.get(0).getValue();
    System.out.println(java.util.Arrays.toString(joints[0]));
}
Maven: com.microsoft.onnxruntime:onnxruntime. This is also the path for Android, where Kotlin calls the same API.
import * as ort from "onnxruntime-web";
// Node:  import * as ort from "onnxruntime-node";

const session = await ort.InferenceSession.create("model.onnx");

const pose = new ort.Tensor("float32",
    Float32Array.from([0.5, 0.3, 0.2, 0.0, 0.0, 0.0]), [1, 6]);

const output = await session.run({ pose });
console.log(output.joints.data);   // Float32Array, real joint units
npm i onnxruntime-web for the browser, or onnxruntime-node for a server. The browser build runs the model on WebAssembly or WebGPU.
package main

import (
    "fmt"
    ort "github.com/yalue/onnxruntime_go"
)

func main() {
    ort.SetSharedLibraryPath("onnxruntime.dll")   // .so on Linux
    if err := ort.InitializeEnvironment(); err != nil { panic(err) }
    defer ort.DestroyEnvironment()

    pose, _ := ort.NewTensor(ort.NewShape(1, 6),
        []float32{0.5, 0.3, 0.2, 0.0, 0.0, 0.0})
    defer pose.Destroy()

    joints, _ := ort.NewEmptyTensor[float32](ort.NewShape(1, N_JOINTS))
    defer joints.Destroy()

    sess, _ := ort.NewAdvancedSession("model.onnx",
        []string{"pose"}, []string{"joints"},
        []ort.ArbitraryTensor{pose}, []ort.ArbitraryTensor{joints}, nil)
    defer sess.Destroy()

    sess.Run()
    fmt.Println(joints.GetData())
}
Go has no first-party ONNX Runtime binding. onnxruntime_go is a cgo wrapper around the C API and needs the shared library present at run time.
7.4 PyTorch
File: model.pt · Runtime: PyTorch 2.0+ ·
Use for: continued training, fine-tuning, research
torch.load, not
torch.jit.load. That is what makes it re-trainable.
import torch
import numpy as np
from backend.ml.models import create_model

ckpt  = torch.load("model.pt", map_location="cpu", weights_only=False)
model = create_model(ckpt["model_type"], ckpt["input_dim"], ckpt["output_dim"])
model.load_state_dict(ckpt["model_state_dict"])
model.eval()

# This is the ONE format where you normalize yourself -- a bare checkpoint has
# no graph to fold the constants into.
x_mean, x_std = np.array(ckpt["x_mean"]), np.array(ckpt["x_std"])
y_mean, y_std = np.array(ckpt["y_mean"]), np.array(ckpt["y_std"])

pose = np.array([[0.5, 0.3, 0.2, 0.0, 0.0, 0.0]])
x = torch.tensor((pose - x_mean) / x_std, dtype=torch.float32)

with torch.no_grad():
    joints = model(x).numpy() * y_std + y_mean

print(joints[0])
Needs the NeuroIK source on the Python path for create_model.
7.5 TorchScript
File: model_torchscript.pt + model_meta.json ·
Runtime: LibTorch C++, PyTorch 2.0+, TorchServe ·
Architectures: all six
A TorchScript module is self-contained: it carries its own architecture, so it loads
with no model class, no create_model, and no NeuroIK source on the target machine. The
module is traced and then torch.jit.freezed, which inlines the weights and folds away the
module hierarchy.
This is the full-precision option for C++ robot controllers — no conversion to a foreign framework, so the numbers match PyTorch to within float round-off (validated at export to 1e-5 of a joint standard deviation).
#include <torch/script.h>
#include <iostream>

int main() {
    torch::jit::script::Module model = torch::jit::load("model_torchscript.pt");
    model.eval();

    // Raw pose -- normalization is traced into the module.
    torch::Tensor pose = torch::tensor({{0.5f, 0.3f, 0.2f, 0.0f, 0.0f, 0.0f}});

    torch::NoGradGuard no_grad;
    torch::Tensor joints = model.forward({pose}).toTensor();

    std::cout << joints << std::endl;   // real joint units
}
Download LibTorch and point CMake at it with -DCMAKE_PREFIX_PATH.
import torch

model = torch.jit.load("model_torchscript.pt")
model.eval()

pose = torch.tensor([[0.5, 0.3, 0.2, 0.0, 0.0, 0.0]])

with torch.no_grad():
    joints = model(pose)

print(joints[0])   # degrees / metres -- no normalization needed
No NeuroIK source required, unlike the raw .pt checkpoint.
import org.pytorch.Module;
import org.pytorch.Tensor;
import org.pytorch.IValue;

Module model = Module.load("model_torchscript.pt");

float[] data = {0.5f, 0.3f, 0.2f, 0.0f, 0.0f, 0.0f};
Tensor pose  = Tensor.fromBlob(data, new long[]{1, 6});

Tensor joints = model.forward(IValue.from(pose)).toTensor();
float[] out   = joints.getDataAsFloatArray();
org.pytorch:pytorch_android for mobile, or the JVM bindings on desktop. Kotlin calls this same API unchanged.
# CMakeLists.txt
#   find_package(Torch REQUIRED)
#   add_executable(ik main.cpp)
#   target_link_libraries(ik "${TORCH_LIBRARIES}")
#   set_property(TARGET ik PROPERTY CXX_STANDARD 17)

mkdir build && cd build
cmake -DCMAKE_PREFIX_PATH=/path/to/libtorch ..
cmake --build . --config Release
7.6 TF Lite
File: model.tflite + model_meta.json ·
Runtime: TFLite, Android, iOS, embedded Linux ·
Architectures: MLP, PINN
Weights are transferred into an equivalent tf.keras functional model — with the
normalization constants folded into the first and last Dense layers — then converted and
checked against PyTorch through the TFLite interpreter.
import org.tensorflow.lite.Interpreter

val interpreter = Interpreter(loadModelFile("model.tflite"))

// Raw pose: x, y, z (m), roll, pitch, yaw (rad). Normalization is folded
// into the first and last Dense layers.
val pose   = arrayOf(floatArrayOf(0.5f, 0.3f, 0.2f, 0.0f, 0.0f, 0.0f))
val joints = Array(1) { FloatArray(N_JOINTS) }

interpreter.run(pose, joints)
// joints[0] is in degrees / metres

interpreter.close()
implementation "org.tensorflow:tensorflow-lite:2.x" in build.gradle.
import org.tensorflow.lite.Interpreter;

Interpreter interpreter = new Interpreter(loadModelFile("model.tflite"));

float[][] pose   = {{0.5f, 0.3f, 0.2f, 0.0f, 0.0f, 0.0f}};
float[][] joints = new float[1][N_JOINTS];

interpreter.run(pose, joints);
interpreter.close();
import numpy as np
import tflite_runtime.interpreter as tflite # or: tf.lite
interp = tflite.Interpreter("model.tflite")
interp.allocate_tensors()
inp = interp.get_input_details()[0]
out = interp.get_output_details()[0]
pose = np.array([[0.5, 0.3, 0.2, 0.0, 0.0, 0.0]], dtype=np.float32)
interp.set_tensor(inp["index"], pose)
interp.invoke()
print(interp.get_tensor(out["index"])[0])tflite_runtime is a ~2 MB wheel -- it does not pull in TensorFlow.
#include "tensorflow/lite/interpreter.h"
#include "tensorflow/lite/kernels/register.h"
#include "tensorflow/lite/model.h"

auto model = tflite::FlatBufferModel::BuildFromFile("model.tflite");
tflite::ops::builtin::BuiltinOpResolver resolver;

std::unique_ptr<tflite::Interpreter> interpreter;
tflite::InterpreterBuilder(*model, resolver)(&interpreter);
interpreter->AllocateTensors();

float* in = interpreter->typed_input_tensor<float>(0);
float pose[6] = {0.5f, 0.3f, 0.2f, 0.0f, 0.0f, 0.0f};
std::copy(pose, pose + 6, in);

interpreter->Invoke();
float* joints = interpreter->typed_output_tensor<float>(0);
For embedded Linux. On a microcontroller use the TinyML C header instead -- it has no runtime at all.
7.7 Keras H5
File: model.h5 + model_meta.json ·
Runtime: TensorFlow 2.x / Keras, TF Serving ·
Architectures: MLP, PINN
The network is rebuilt as a genuine tf.keras Functional model and the weights are
transferred layer by layer, so the result is a first-class Keras model — no PyTorch required
on the target. Use it to drop IK into an existing TensorFlow pipeline, serve it with TF
Serving, or fine-tune it further in Keras.
import numpy as np
import tensorflow as tf

model = tf.keras.models.load_model("model.h5")

# Raw pose -- normalization is inside the first and last layers.
pose = np.array([[0.5, 0.3, 0.2, 0.0, 0.0, 0.0]], dtype=np.float32)

joints = model.predict(pose, verbose=0)
print(joints[0])          # degrees / metres
Needs no PyTorch -- the network was rebuilt as a native Keras model.
// One-off conversion, on your machine:
//     pip install tensorflowjs
//     tensorflowjs_converter --input_format=keras model.h5 tfjs_model/

import * as tf from "@tensorflow/tfjs";

const model = await tf.loadLayersModel("tfjs_model/model.json");

const pose   = tf.tensor2d([[0.5, 0.3, 0.2, 0.0, 0.0, 0.0]]);
const joints = model.predict(pose);

console.log(await joints.data());   // real joint units
pose.dispose(); joints.dispose();
Runs in a browser with no server. Dispose tensors or the WebGL backend leaks memory.
# Serve it with TensorFlow Serving instead of loading it in-process
python - <<'EOF'
import tensorflow as tf
m = tf.keras.models.load_model("model.h5")
m.export("saved_model/1")          # TF Serving wants a version directory
EOF

docker run -p 8501:8501 \
  --mount type=bind,source=$PWD/saved_model,target=/models/ik \
  -e MODEL_NAME=ik tensorflow/serving

curl -d '{"instances": [[0.5, 0.3, 0.2, 0.0, 0.0, 0.0]]}' \
     http://localhost:8501/v1/models/ik:predict
7.8 TensorRT
File: model_tensorrt.onnx + model_meta.json ·
Runtime: TensorRT 8.x+, Triton
An ONNX graph with constant folding applied, ready to be compiled into a TensorRT engine on the target device — engines are hardware-specific and not portable.
#include <NvInfer.h>
#include <fstream>
#include <vector>

// Load the engine you built with trtexec on THIS machine.
std::ifstream f("model.engine", std::ios::binary);
std::vector<char> blob((std::istreambuf_iterator<char>(f)), {});

auto runtime = nvinfer1::createInferRuntime(logger);
auto engine  = runtime->deserializeCudaEngine(blob.data(), blob.size());
auto ctx     = engine->createExecutionContext();

float pose[6] = {0.5f, 0.3f, 0.2f, 0.0f, 0.0f, 0.0f};
float joints[N_JOINTS];

void *d_in, *d_out;
cudaMalloc(&d_in,  sizeof(pose));
cudaMalloc(&d_out, sizeof(joints));
cudaMemcpy(d_in, pose, sizeof(pose), cudaMemcpyHostToDevice);

void* bindings[] = {d_in, d_out};
ctx->executeV2(bindings);

cudaMemcpy(joints, d_out, sizeof(joints), cudaMemcpyDeviceToHost);
Link nvinfer and cudart.
import numpy as np
import tensorrt as trt
import pycuda.driver as cuda
import pycuda.autoinit

with open("model.engine", "rb") as f, trt.Runtime(trt.Logger()) as rt:
    engine = rt.deserialize_cuda_engine(f.read())

ctx  = engine.create_execution_context()
pose = np.array([[0.5, 0.3, 0.2, 0.0, 0.0, 0.0]], dtype=np.float32)
out  = np.empty((1, N_JOINTS), dtype=np.float32)

d_in  = cuda.mem_alloc(pose.nbytes)
d_out = cuda.mem_alloc(out.nbytes)
cuda.memcpy_htod(d_in, pose)
ctx.execute_v2([int(d_in), int(d_out)])
cuda.memcpy_dtoh(out, d_out)

print(out[0])
# The engine is hardware-specific -- build it on the machine that
# will run it, from the ONNX file NeuroIK exported.
trtexec --onnx=model.onnx --saveEngine=model.engine --fp16
# Sanity-check throughput before wiring it into anything
trtexec --loadEngine=model.engine --iterations=1000An engine built on an RTX 4090 will not load on a Jetson. This step is not optional.
7.9 ROS2 Package
Runtime: ROS2 Humble / Iron · Output: a ready-to-build package · Architectures: all six
The package ships with the weights inside it — no copying files around, no NeuroIK source needed on the robot:
neuroik_ros2/
├── package.xml
├── setup.py                  # package_data ships the weights
├── resource/neuroik_ros2     # ament marker (required for discovery)
└── neuroik_ros2/
    ├── __init__.py
    ├── ik_node.py            # constants + load_model() + predict()
    ├── best_model.pt         # the raw checkpoint
    ├── model_traced.pt       # TorchScript — carries its own architecture
    └── model_meta.json       # "normalization_baked_in": false
load_model() prefers model_traced.pt, so the node runs standalone with
nothing but torch installed. It falls back to best_model.pt, which needs
NeuroIK's backend package importable.
#!/usr/bin/env python3
import rclpy
from rclpy.node import Node
from geometry_msgs.msg import Pose
from sensor_msgs.msg import JointState

class IKNode(Node):
    def __init__(self):
        super().__init__("neuroik_ik")
        self.sub = self.create_subscription(Pose, "target_pose", self.solve, 10)
        self.pub = self.create_publisher(JointState, "joint_command", 10)

    def solve(self, msg):
        pose = [msg.position.x, msg.position.y, msg.position.z, 0.0, 0.0, 0.0]
        joints = self.model_forward(pose)     # generated for you in ik_node.py

        out = JointState()
        out.header.stamp = self.get_clock().now().to_msg()
        out.name     = self.joint_names
        out.position = [float(j) for j in joints]
        self.pub.publish(out)

rclpy.init(); rclpy.spin(IKNode())
The generated node applies normalization explicitly -- its meta says normalization_baked_in: false. This is the one export where that is true.
#include <rclcpp/rclcpp.hpp>
#include <torch/script.h>
#include <sensor_msgs/msg/joint_state.hpp>

class IKNode : public rclcpp::Node {
public:
    IKNode() : Node("neuroik_ik") {
        model_ = torch::jit::load("model_traced.pt");   // shipped in the package
        pub_ = create_publisher<sensor_msgs::msg::JointState>("joint_command", 10);
    }
private:
    torch::jit::script::Module model_;
    rclcpp::Publisher<sensor_msgs::msg::JointState>::SharedPtr pub_;
};
The generated package is Python. This is the shape of a C++ node if you rewrite it -- the TorchScript model in the package loads from either.
# The weights are inside the package already -- best_model.pt, a
# TorchScript model_traced.pt and model_meta.json. Only torch is needed.

cd ~/ros2_ws/src
unzip ~/Downloads/neuroik_ik_ros2.zip
cd ~/ros2_ws && colcon build --packages-select neuroik_ik
source install/setup.bash

ros2 run neuroik_ik ik_node

# In another terminal:
ros2 topic pub /target_pose geometry_msgs/msg/Pose \
  "{position: {x: 0.5, y: 0.3, z: 0.2}}"
ros2 topic echo /joint_command
7.10 TinyML (C header)
File: ik_model.h ·
Runtime: ESP32, Arduino, STM32, any C99 toolchain ·
Dependencies: none — just math.h
A single self-contained header: weights, normalization constants, and a real
ik_forward(). No interpreter, no framework, no heap allocation.
| Symbol | Purpose |
|---|---|
IK_INPUT_DIM / IK_OUTPUT_DIM | Pose and joint counts |
ik_forward(pose, joints) | Full inference — normalizes, runs the net, denormalizes |
IK_X_MEAN, IK_X_STD, IK_Y_MEAN, IK_Y_STD | Constants (already applied inside ik_forward) |
#include "ik_model.h"
#include <stdio.h>

int main(void) {
    // Raw pose -- normalization is compiled into the generated function.
    float pose[6]   = {0.5f, 0.3f, 0.2f, 0.0f, 0.0f, 0.0f};
    float joints[N_JOINTS];

    ik_forward(pose, joints);

    for (int i = 0; i < N_JOINTS; i++)
        printf("q%d = %.3f\n", i + 1, joints[i]);
    return 0;
}
One header, no linking. Weights live in flash as const arrays; the only RAM used is a scratch buffer sized to the widest layer.
// Arduino / ESP32 -- the same header, unchanged.
#include "ik_model.h"

void setup() {
    Serial.begin(115200);
}

void loop() {
    float pose[6] = {0.5f, 0.3f, 0.2f, 0.0f, 0.0f, 0.0f};
    float joints[N_JOINTS];

    unsigned long t0 = micros();
    ik_forward(pose, joints);
    unsigned long dt = micros() - t0;

    Serial.printf("q1=%.2f  (%lu us)\n", joints[0], dt);
    delay(1000);
}
Drop ik_model.h next to your .ino. MLP models only -- the other architectures cannot reduce to straight-line C.
# Desktop sanity check before flashing anything
gcc -O2 -o ik main.c -lm && ./ik

# ESP32 via idf.py -- just add the header to your component
idf.py build flash monitorik_forward() is generated only for MLP
models — a diffusion sampler or attention stack cannot be reduced to straight-line C. Other
architectures still export their raw weights, but you must write the forward pass yourself. For
embedded targets, train an MLP.
7.11 Native library (.dll / .so)
Files: neuroik_ik.dll (or .so), ik_model.h,
ik_dll.c, build_dll.bat, build_lib.sh ·
Runtime: C/C++, C#/.NET, Python, LabVIEW, MATLAB ·
Architectures: MLP, PINN
The same straight-line C that powers the TinyML export, compiled into a shared library with a plain C ABI. Zero dependencies beyond the C runtime — no PyTorch, no ONNX Runtime, no Python. Ideal when a native application needs IK and cannot take on an ML stack.
| Exported symbol | Signature | Purpose |
|---|---|---|
neuroik_ik_forward | void (const float *pose, float *joints) |
Full inference — normalizes, runs the net, denormalizes |
neuroik_input_dim | int (void) | Pose size (6) |
neuroik_output_dim | int (void) | Joint count |
#include <stdio.h>

// Exported by the generated library. C linkage -- no name mangling.
extern "C" int neuroik_ik_forward(const float* pose, float* joints);

int main() {
    float pose[6] = {0.5f, 0.3f, 0.2f, 0.0f, 0.0f, 0.0f};
    float joints[N_JOINTS];

    neuroik_ik_forward(pose, joints);     // returns 0 on success

    for (int i = 0; i < N_JOINTS; i++) printf("%.3f ", joints[i]);
}
Link neuroik.lib on Windows or -lneuroik on Linux. No runtime dependencies at all -- normalization is compiled in.
using System.Runtime.InteropServices;

class NeuroIK {
    [DllImport("neuroik.dll", CallingConvention = CallingConvention.Cdecl)]
    public static extern int neuroik_ik_forward(float[] pose, float[] joints);
}

float[] pose   = { 0.5f, 0.3f, 0.2f, 0.0f, 0.0f, 0.0f };
float[] joints = new float[N_JOINTS];

NeuroIK.neuroik_ik_forward(pose, joints);
Console.WriteLine(string.Join(", ", joints));
Put neuroik.dll beside the executable, or anywhere on PATH.
import ctypes
import numpy as np

lib = ctypes.CDLL("./neuroik.dll")        # ./libneuroik.so on Linux
lib.neuroik_ik_forward.argtypes = [
    ctypes.POINTER(ctypes.c_float), ctypes.POINTER(ctypes.c_float)]
lib.neuroik_ik_forward.restype = ctypes.c_int

pose   = np.array([0.5, 0.3, 0.2, 0.0, 0.0, 0.0], dtype=np.float32)
joints = np.zeros(N_JOINTS, dtype=np.float32)

lib.neuroik_ik_forward(
    pose.ctypes.data_as(ctypes.POINTER(ctypes.c_float)),
    joints.ctypes.data_as(ctypes.POINTER(ctypes.c_float)))

print(joints)
No PyTorch needed -- useful when you want IK inside a Python tool without a 2 GB dependency.
package main

/*
#cgo LDFLAGS: -L. -lneuroik
int neuroik_ik_forward(const float* pose, float* joints);
*/
import "C"
import "fmt"

func main() {
    pose   := [6]C.float{0.5, 0.3, 0.2, 0.0, 0.0, 0.0}
    joints := make([]C.float, N_JOINTS)

    C.neuroik_ik_forward(&pose[0], &joints[0])

    for _, j := range joints { fmt.Printf("%.3f ", float32(j)) }
}
cgo calls the C ABI directly. Keep the library on the linker path at build time and on the loader path at run time.
import com.sun.jna.Library;
import com.sun.jna.Native;

public interface NeuroIK extends Library {
    NeuroIK INSTANCE = Native.load("neuroik", NeuroIK.class);
    int neuroik_ik_forward(float[] pose, float[] joints);
}

float[] pose   = {0.5f, 0.3f, 0.2f, 0.0f, 0.0f, 0.0f};
float[] joints = new float[N_JOINTS];

NeuroIK.INSTANCE.neuroik_ik_forward(pose, joints);
JNA (net.java.dev.jna:jna) needs no JNI glue code of your own.
loadlibrary('neuroik', 'ik_dll.h');

pose   = single([0.5 0.3 0.2 0.0 0.0 0.0]);
joints = single(zeros(1, N_JOINTS));

[~, ~, joints] = calllib('neuroik', 'neuroik_ik_forward', pose, joints);
disp(joints)

unloadlibrary('neuroik');
Everything must be single precision -- MATLAB defaults to double and the C ABI expects float.
7.12 Core ML
File: NeuroIK.mlpackage (or NeuroIK.mlmodel) +
model_meta.json ·
Runtime: iOS 15+, macOS 12+, Apple Neural Engine ·
Requires: pip install coremltools
For Apple platforms. Converted through TorchScript, so the same raw-pose-in / real-joints-out
contract applies, and Core ML will schedule it on the Neural Engine where available.
coremltools is an optional dependency — install it only if you need this format.
import CoreML

let model = try IKModel(configuration: MLModelConfiguration())

// Raw pose -- normalization is inside the model.
let input = try MLMultiArray(shape: [1, 6], dataType: .float32)
let pose: [Float] = [0.5, 0.3, 0.2, 0.0, 0.0, 0.0]
for (i, v) in pose.enumerated() { input[i] = NSNumber(value: v) }

let output = try model.prediction(pose: input)

for i in 0..<output.joints.count {
    print("q\(i + 1) = \(output.joints[i])")
}
Drag the .mlpackage into Xcode and it generates the IKModel class for you.
import numpy as np
import coremltools as ct

model = ct.models.MLModel("model.mlpackage")

pose = np.array([[0.5, 0.3, 0.2, 0.0, 0.0, 0.0]], dtype=np.float32)
out  = model.predict({"pose": pose})

print(out["joints"])
Prediction requires macOS. On Windows or Linux coremltools can write the file but cannot run it, so NeuroIK reports the export as unvalidated there.
8Application Architecture
Robot Config & Recipe
Links, joint types, limits
Dataset Generator
Forward kinematics → reachable samples
ML Trainer
PyTorch · task-space loss
Simulation Studio
Three.js 3D · FK validation
Exporter
Trained checkpoint → deployable artifact
Key internals
| Mechanism | What it does |
|---|---|
| FK-first data | Every sample is reachable by construction |
| Task-space loss | Training rewards reaching the target, not matching one arbitrary joint solution |
| Progress streaming | Generation and training push live progress to the UI |
| Output-dim matching | The final layer matches the robot's joint count; a mismatched model is rejected rather than silently used |
| Normalization | Pose and joints normalized by dataset statistics; constants saved with the checkpoint and folded into every export so deployed models take a raw pose and return real joint units |
| Export validation | Each convertible format is run and compared against PyTorch numerically (not just by output shape) before the export is accepted |
| Degenerate masking | Dimensions that never vary (a Delta's orientation) are masked so they add no noise |
| Diffusion sampling | 16 candidates → FK each → keep the closest |
| Rejection sampling | Physically impossible configurations (a Delta whose arms can't assemble) return NaN from FK and are resampled, never written to a dataset |
| Exact URDF engine | Imported robots use each joint's real origin/axis instead of generated DH parameters, so CAD geometry lines up with the motion |
Kinematic engines
Each robot family has its own engine under backend/core/. They share one interface —
forward_kinematics, inverse_kinematics, and a differentiable
torch_forward_kinematics used for the task-space loss — so the dataset generator, trainer
and simulator treat every robot identically.
| Engine | FK | IK |
|---|---|---|
scara.py | Closed-form | Analytical (elbow-down) |
cartesian.py | Direct mapping | Direct inverse |
delta.py | Trilateration of three spheres | Per-arm analytical, verified by FK round-trip |
articulated.py | Auto-generated DH chain | Damped least-squares, 12 restarts |
urdf_robot.py | Real origin·axis chain | Damped least-squares, 12 restarts |
The DLS solver weights position 10× over orientation — reaching the XYZ target is the point of IK — and reports no solution rather than returning an unconverged guess.
9Project Management
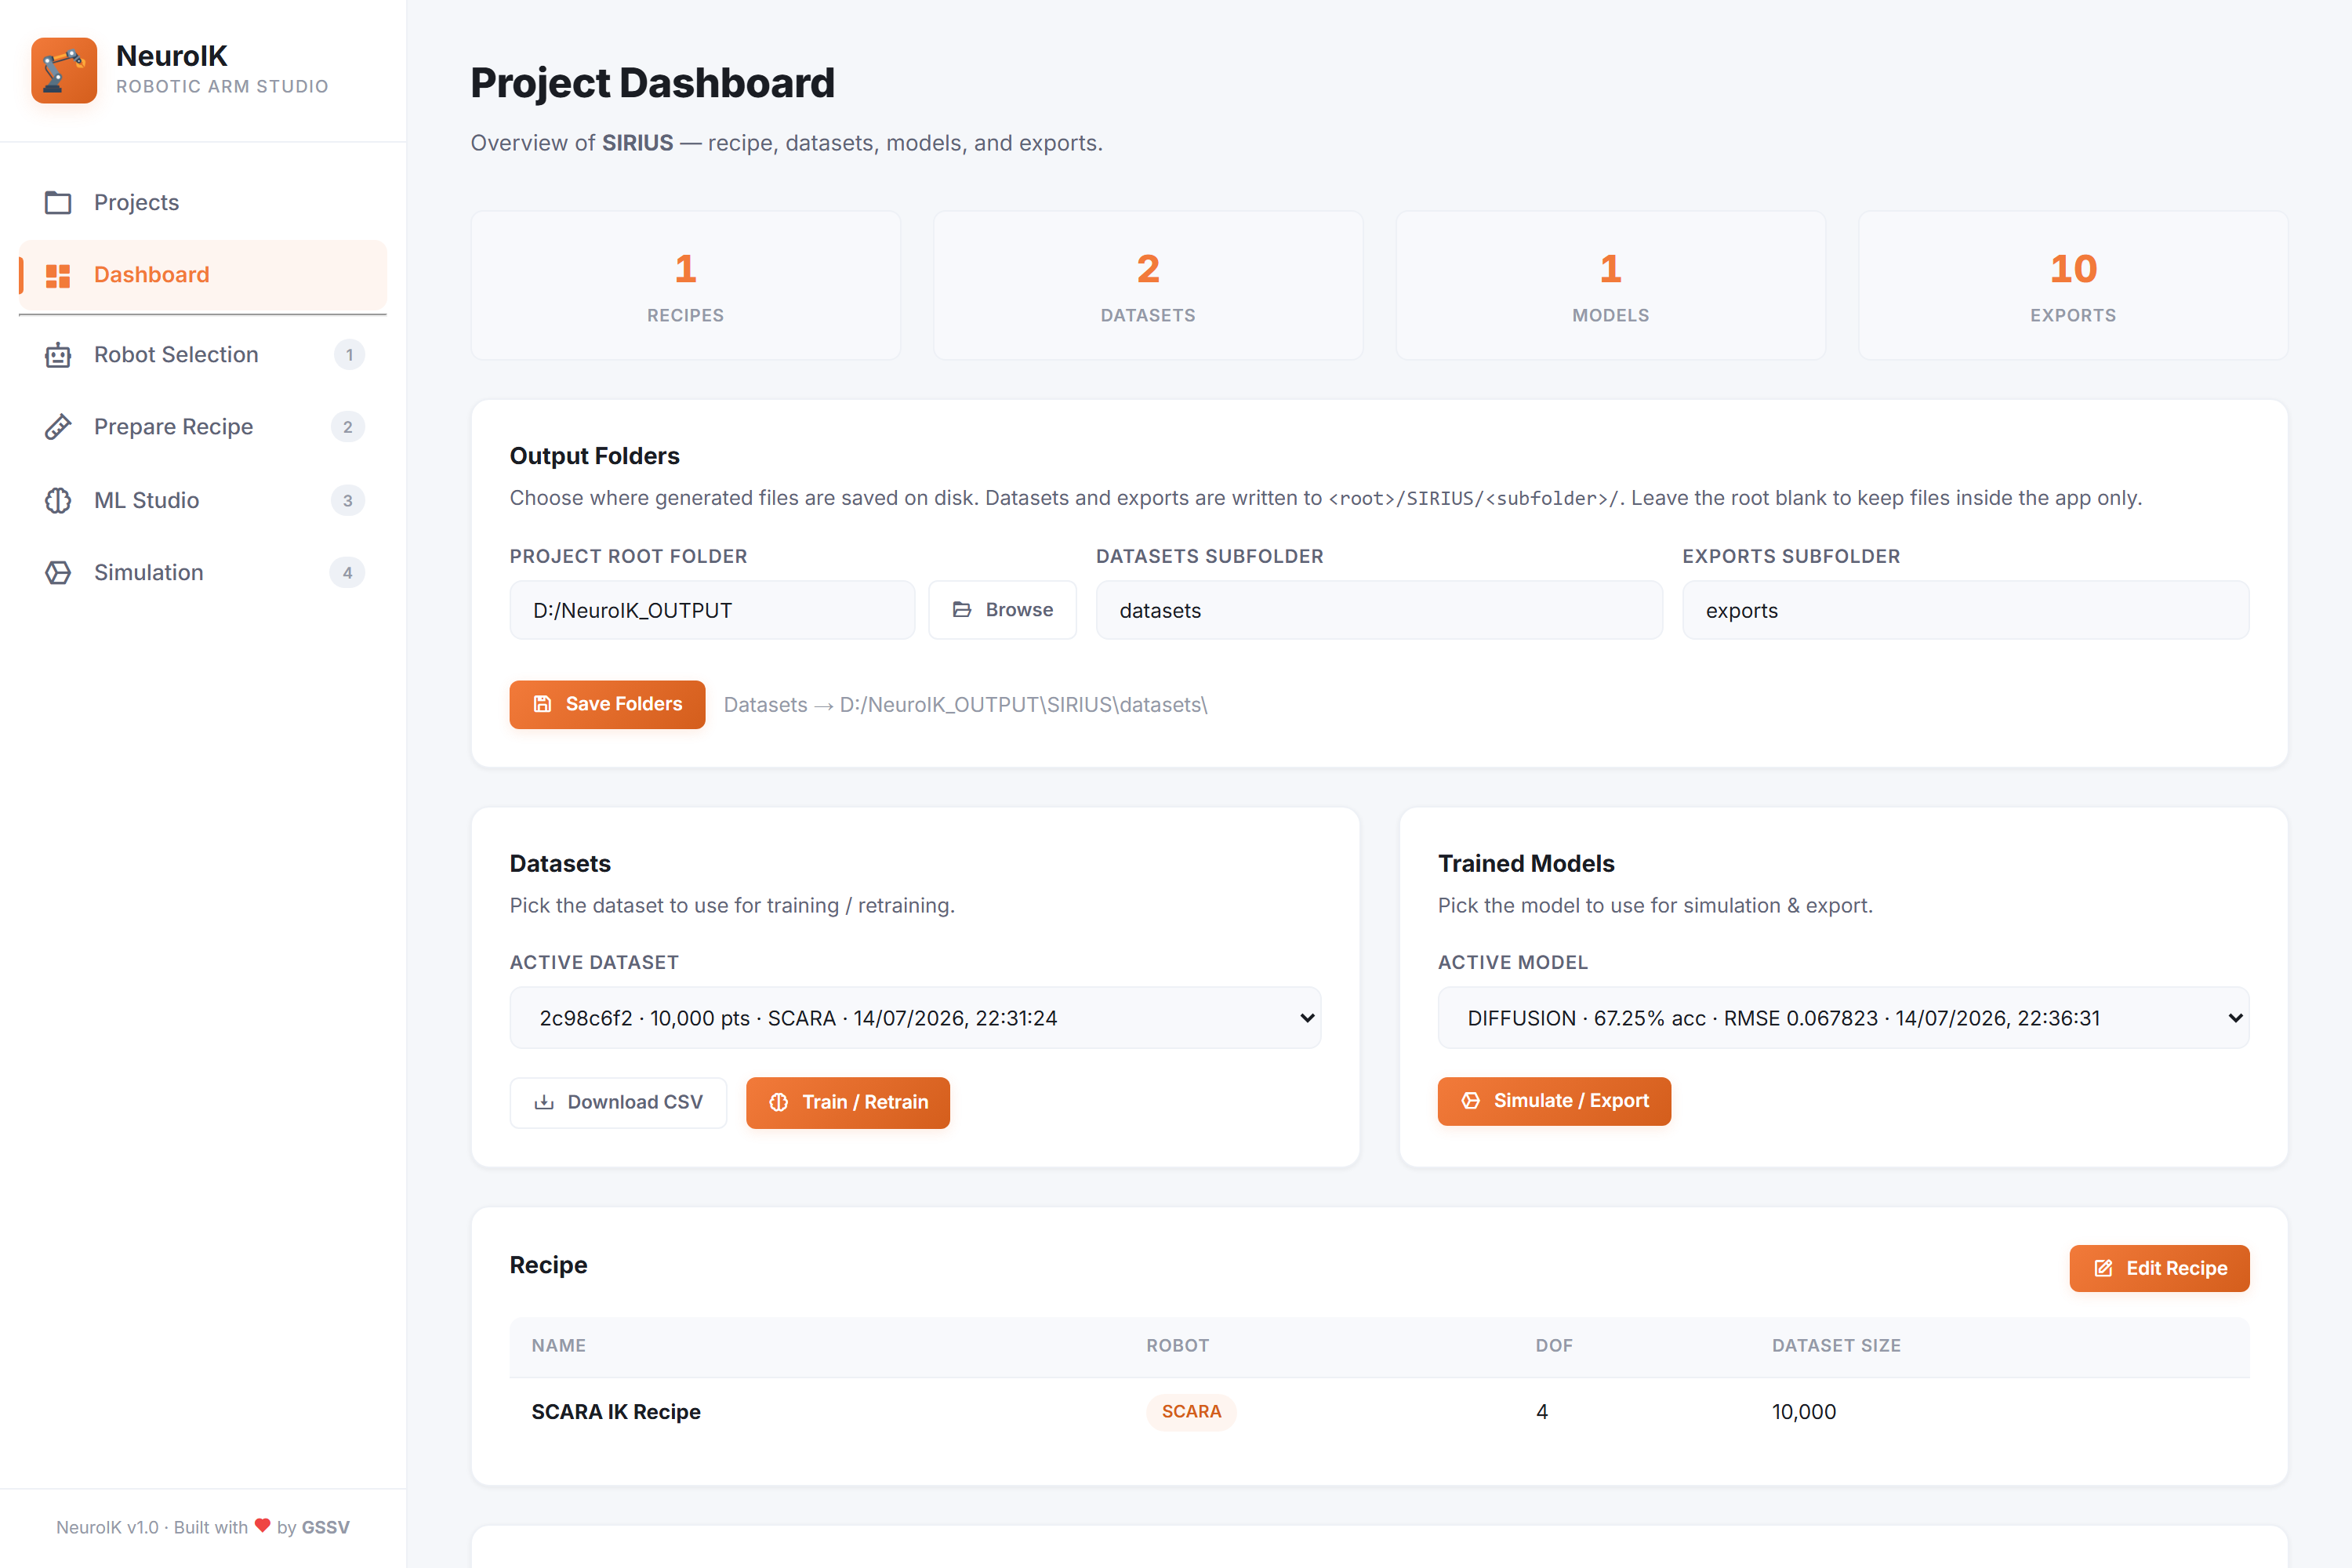
A project is the unit of work. It stores the robot type, recipe, every generated dataset, every
training run with its metrics, and every export — as JSON under data/projects/. Reopening
restores all of it, even after a restart.
Choosing which dataset / model to use
A project can hold several datasets and several trained models. The Dashboard has a dropdown for each:
- Active dataset → used by ML Studio for training and retraining.
- Active model → used by Simulation for prediction and by Export.
Deleting datasets and models
Each selector has a Delete button that removes the selected dataset or trained model
from the project and deletes the app's working copy under data/. If you delete the active
one, the next most recent is promoted automatically.
Output folders
By default files stay in the app's data/ folder. Set a Project Root Folder
(the Browse button opens a native folder picker) and NeuroIK also mirrors deliverables to:
<root>/<project name>/
├── datasets/          # dataset_<id>.csv
└── exports/
    ├── onnx/          # model.onnx + model_meta.json
    ├── tinyml/        # ik_model.h
    └── ros2/          # neuroik_ros2/ package
The copy in data/ is kept as the working copy the trainer and simulator read from.
Imported URDF projects
A project that uses a Custom URDF also stores the path to the source file. Reopening re-reads it, restoring the exact chain and the CAD meshes. If that folder has since moved or been deleted, the kinematics still come back from the recipe saved in the project — only the meshes are missing, and NeuroIK asks you to re-import to restore them.
10Troubleshooting & FAQ
1. The exported model returns nonsense values
Almost always double normalization. Every export except the ROS2 package now has the
constants baked in, so you must feed a raw pose and read real joint units directly.
Applying (pose - x_mean) / x_std yourself normalizes the input twice. Check
normalization_baked_in in model_meta.json and see
§7.1.
If you are loading the raw model.pt checkpoint, the opposite applies — that one is
the bare network and does need the constants. Use TorchScript if you just
want to run the model.
2. Export fails with “disagrees with PyTorch by …”
Working as intended: every convertible format is checked numerically against PyTorch before it is written, and the export is aborted rather than shipping a model that computes the wrong function. Report the number — it is expressed in units of a joint standard deviation.
3. “Only plain feed-forward models (MLP, PINN) can be converted”
TF Lite, Keras H5 and the native DLL rebuild the network layer by layer, which only works for a plain
stack. Diffusion, GNN, transformer and RL keep their logic in forward(). Either train an
MLP for those targets or export ONNX/TorchScript instead — see the
support matrix.
4. Export succeeds but validation fails
The model's output width must equal the robot's joint count. Check that the active robot matches the
one the model was trained on. For Core ML off macOS, and ROS2 when
TorchScript tracing is unavailable, validation_passed is reported as false
by design — the file is still produced, but the check could not be run here.
5. “No trained model found” when exporting
Train a model first. Export uses the model selected on the Dashboard, falling back to the most recent checkpoint.
6. Accuracy is poor
In order: generate more data (100K+), train longer, confirm the robot config matches training, then try a stronger architecture (Transformer/Diffusion). If you changed the recipe, you must regenerate and retrain.
7. Diffusion inference feels slow
By design — it samples 16 candidates and FK-checks each. For real-time control use MLP or Transformer.
8. TF Lite or Keras H5 export fails
TensorFlow is required for both: pip install tensorflow. Core ML likewise needs
pip install coremltools. Every other format works without either.
9. TinyML header has no ik_forward()
You exported a non-MLP model. Only plain feed-forward networks reduce to straight-line C. Train an MLP.
10. The 3D viewport is blank
The viewport uses WebGL. Update your GPU drivers; on a remote/virtual desktop, hardware acceleration may be unavailable.
11. Dataset generation takes too long
1M samples with a complex chain takes several minutes. Use 100K while iterating.
12. "No .urdf or .xacro file found under: <path>"
The folder holds no description file. Point at the folder that actually contains the
.urdf/.xacro (subfolders are searched too), or at the file itself. Quoted
paths pasted from Explorer's Copy as path are handled.
13. My URDF imported, but a link's mesh is missing
Two likely reasons. Either the mesh is in an unsupported format — only STL, DAE and OBJ
render; STEP/IGES show a placeholder — or the URDF never declares that link. NeuroIK draws what the
description declares, so spare meshes shipped in the folder but not referenced by any
<link> won't appear. The import warnings list both cases.
14. "This file uses <xacro:macro>"
Macro expansion isn't supported — a partial implementation could silently build the wrong robot. Pre-expand with the ROS tool and import the result:
Bashxacro robot.xacro -o robot.urdf15. My imported robot has one DOF fewer than I expected
Probably a <mimic> joint — a gripper's second finger, say. It is mechanically driven
by another joint, so it is not an independent DOF and must not be a network output. It still moves in the
3D view, following its source joint.
You can design a robot arm in a weekend.
Knowing whether it works is the part that takes six months.
Every step between a CAD folder and a moving machine is answerable with maths that has existed for forty years. The reason it still takes six months is that the maths lives in six different tools, none of which know your robot.
NeuroIK is all six, sharing one robot description.
1The problem nobody warns you about
You have a robot arm. Maybe you designed it, maybe a supplier sent you a folder of STLs. You know its geometry exactly. And you still cannot answer the questions that decide whether it ships:
Every one of these has an exact answer. Not an estimate — an exact answer, from the geometry you already have. The gap is not knowledge. The gap is that answering them means a MATLAB licence, a ROS workspace, three Python notebooks you wrote and no longer trust, and a spreadsheet where you once worked out a gravity torque by hand.
2What the scattered workflow actually costs
It is not the hours. It is that every tool has its own copy of your robot, and they drift.
You change a link length in CAD. Now your DH table is wrong. The notebook that computed the gravity torque still has the old number. The URDF you exported last month still has the old mesh. The dataset you trained on describes a robot that no longer exists. Nothing errors. Everything just quietly answers a question about a different machine.
- CAD → export STLs → hand-write a URDF → fix it for three days
- Derive IK on paper → implement it → hope
- Jacobian in a notebook you wrote in 2022
- Gravity torque in a spreadsheet, dynamics ignored
- Path taught on the real robot, at real risk
- Six copies of the robot, none authoritative
- Meshes in, validated URDF out
- Exact IK, with the algebra shown in your numbers
- Conditioning and singularities across the whole travel
- Full
τ = Mq̈ + Cq̇ + G + F, payload envelope, motor sizing - Path validated at every interpolated point before it runs
- One robot description. Six workflows read it.
3“I have meshes, not a robot”
The problem. A supplier sends thirteen STLs. Your CAD package knows where every gram of metal is and nothing about where the joints are. Writing a URDF by hand means typing origins and axes into XML and reloading RViz until the arm stops folding through itself. Everyone who has done it has lost days to a sign error.
Why it matters. The URDF is not a file — it is the contract every other tool reads. Get an axis backwards and your IK, your dynamics and your path planner are all confidently correct about a robot that does not exist.
What NeuroIK does. Import the meshes and it measures them — bounds, volume,
centroid, watertightness. It catches the millimetre/metre mistake before it propagates. You build
the tree by clicking, set axes from presets, and watch a live 3D preview that applies the exact same
rpy convention the file will use. Then it generates a validated URDF or Xacro package
with the meshes copied in.
4“I derived the IK, but I cannot check it”
The problem. You worked out the closed form on paper. It gives an answer. Is it right? Is it the only answer? A numerical solver converges — but to which of the eight valid configurations, and was the one it picked the one you wanted?
Why it matters. IK is one-to-many. Picking the wrong branch is not a small error — it is the arm swinging through the workpiece to reach the same point from the other side.
What NeuroIK does. Closed-form solvers where the geometry allows one — SCARA with explicit lefty/righty, planar 2R/3R, and a gated Pieper decomposition returning up to eight solutions for a true spherical wrist. Three numerical solvers with multi-start where it does not. Then it shows you the derivation, step by step, with your real numbers substituted into the symbols — not a textbook formula, the actual arithmetic that produced your answer.
Every closed-form candidate is pushed back through forward kinematics before it is offered. If it does not land on the target, you never see it.
5“It reaches. But can it move?”
The problem. Reachability is a solved question and it is the wrong one. An arm can place its tool anywhere in its workspace and still be nearly useless at specific points — demanding enormous joint speed for a slow tool motion, in one particular direction.
Why it matters. This is the failure that looks like a mechanical fault. The arm shudders. A joint screams. The servo faults on overspeed. Nothing is broken — you drove it through a singularity, and the geometry told you it was coming if anyone had asked.
What NeuroIK does. Full SVD of the Jacobian at any pose: singular values, rank, condition number, Yoshikawa manipulability, isotropy. A velocity ellipsoid drawn in 3D that flattens into a disc at the exact moment a direction of motion is lost — you do not read that in a number, you watch it happen. Then a singularity map across one joint's full travel, or a heatmap across two, so you can see where the bad regions are before you plan a path through them.
6“I sized the motors from the holding torque”
The problem. Almost everyone computes gravity torque, picks a motor with margin, and ships. Gravity is the term that is non-zero standing still — it is also routinely a fraction of what the joint delivers during a real move.
Why it matters. The motor stalls on the bench. The gearbox wears in six months. The arm cannot run the cycle time you promised. And the fix is mechanical, so it costs the whole build.
What NeuroIK does. Recursive Newton-Euler, the full equation —
τ = M(q)q̈ + C(q,q̇)q̇ + G(q) + F(q̇) — with every term broken out so you can attribute
a torque instead of guessing at it. Feed it a trajectory and get peak, RMS (the
thermal question everyone skips), peak power, energy, and the instant the peak occurs. Sweep the
whole workspace for the worst-case payload — the figure that belongs on a spec sheet, not the
flattering one at the pose you happened to be standing in.
7“The path worked in simulation”
The problem. You teach four waypoints. All four are reachable. The move fails anyway — because the arm has to pass through somewhere unreachable to get between two reachable points, and nothing checked the space in between.
Why it matters. You find out on hardware, at speed, with a tool in the gripper.
What NeuroIK does. Line, spline, arc and spiral segments; IK solved at every interpolated point, not just the waypoints, each seeded from its predecessor so the arm cannot flip elbow-up to elbow-down mid-path. Self-collision against capsule links, obstacle checks, and singularity flagging across the whole trajectory. Then a real time schedule — trapezoidal or jerk-limited S-curve — and export to CSV, JSON, Epson SPEL+, G-code or a ROS 2 JointTrajectory node.
8“I need IK on hardware that cannot run a solver”
The problem. Your controller is an ESP32. It has no room for an iterative solver and no time for one. But you still need inverse kinematics at loop rate.
Why it matters. This is the wall between a good desktop prototype and a product.
What NeuroIK does. Generates the dataset forward — sampling joint values inside the real limits and computing where the tool lands — so every training sample is reachable by construction and no impossible pose ever enters training. Trains against a task-space loss, which rewards any joint vector that reaches the target instead of forcing the network to average conflicting valid answers. Six architectures, live metrics, 3D validation. Then exports to ten targets — ONNX, TorchScript, TF Lite, TensorRT, ROS 2, a plain C header, a native DLL, Core ML — with normalisation baked in, so you feed a raw pose in metres and read real joint units straight out.
ik_forward() in straight-line C with no dependencies. Copy the header into your
firmware. Done.
9The feature nobody advertises: it refuses to guess
Any tool can print a number. The question is whether you can stake a build on it.
NeuroIK declines, loudly and with the reason, wherever an answer would be fiction:
This is not caution. It is the difference between a tool that helps you build a robot and a tool that helps you build a wrong robot with great confidence.
τ = Mq̈ + Cq̇ + G to 8 × 10⁻¹⁶, payload torque against
−Jᵥᵀ(mg) to 4 × 10⁻⁷, and every kinematic chain against its own
engine's forward kinematics over 1200 configurations to 1 × 10⁻¹⁶.
10The loop that finally closes
This is the part that does not exist anywhere else. One robot description feeds all six.
Change a link length in step 3 and steps 4, 5 and 6 are recomputed from the same description. No re-entry. No drift. No spreadsheet holding last month's number.
And when the mass properties you entered in the CAD studio turn out to be what the Dynamics studio reads, and the joint limits you set in the Jacobian studio turn out to be the exact interval the path planner respects — that is when it stops being six tools and starts being one.
11Is this for you?
Building a custom arm
You have CAD and no ROS workspace. Start at CAD → URDF and you will have a validated description, sized motors and a checked path before you cut metal.
Taking over someone else's robot
Import the URDF and the four analysis studios tell you what it can do — reach, conditioning, torque, payload — in an afternoon.
Teaching or learning kinematics
The derivation shows every step with real substituted numbers, and the velocity ellipsoid makes a singularity something you watch rather than something you are told about.
Shipping IK on embedded hardware
FK-first datasets, six architectures, and an export that becomes a C function with no dependencies.
1What Motion & Path Planning does
The ML for IK workflow trains a network to answer one pose at a time. This workflow answers a different question: given a sequence of poses, produce a motion a controller can actually execute — interpolated in Cartesian space, solved into joint space, time-scheduled against velocity and acceleration limits, checked for collisions and singularities, and exported in a format your controller reads.
The pipeline
- Waypoints — poses you teach, in metres and degrees.
- Segments — how to get from each waypoint to the next: line, curve, arc or spiral.
- Interpolation — the segment is sampled into a dense Cartesian polyline.
- IK sweep — every sample is solved into joint values, seeded from its predecessor.
- Time scheduling — a trapezoidal or S-curve profile turns geometry into a timed trajectory.
- Validation — self-collision, obstacles and singularities, on demand.
- Export — CSV, JSON, Epson SPEL+, G-code or a ROS 2 JointTrajectory.
2Teaching waypoints
A waypoint is a full pose: x, y, z in metres and roll, pitch, yaw in
degrees. Three ways to create one.
Add point
Places a new waypoint at a random reachable pose — sampled from the robot's own workspace cloud, not from a bounding box, so it is never a target the arm cannot make.
Type it
Edit any field directly. The viewport marker and the IK solution update as you do.
Import
Load a JSON or CSV file of points and motion profiles produced earlier, or by another tool.
2.1 Per-waypoint controls
Selecting a waypoint in the list opens its own panel: pose fields, the segment type used to arrive at it, its blend radius, and its own velocity and acceleration scaling. Waypoints can be reordered, duplicated and deleted, and dragging the coloured arrows in the viewport moves one along its axis.
3Segment types
Each segment says how to travel from the previous waypoint to this one. Interpolation happens in task space, so the tool follows the shape you asked for regardless of what the joints have to do.
| Type | Shape | Use it for |
|---|---|---|
| line | Straight-line interpolation between the two poses | The default. Approach and retract moves, any path where the tool must not deviate. |
| curve | Catmull-Rom spline through the waypoint chain, C1 continuous | Smooth passes through several points — dispensing, welding, painting — where the corners would otherwise be visible in the finish. |
| arc | Circular arc through start → via → end | Round features. Three points define the circle exactly; no radius to guess. |
| spiral | Helix about an axis, from centre, radius, pitch and turns | Screwing, coiling, helical milling. |
3.1 Orientation along a segment
Roll, pitch and yaw are interpolated with shortest-angle wrapping. A path that crosses ±180° therefore takes the short way round instead of spinning the wrist almost a full turn — which is both slower and, on a wrist with a hard stop, impossible.
3.2 Corner blending
A blend radius rounds the corner at a waypoint instead of stopping dead on it. The waypoint is still passed near, not through; set the radius to zero for a corner the tool must hit exactly.
4From geometry to a schedule
The planner produces geometry: an ordered list of joint vectors with no notion of time. A controller needs a schedule — when each configuration should be reached, given how fast each joint may move and how hard it may accelerate. Two profiles are offered.
| Profile | Acceleration | Trade |
|---|---|---|
| Trapezoidal | Constant — ramp up, cruise, ramp down | The classic industrial profile. Fastest for a given velocity/acceleration pair, but acceleration steps discontinuously, so jerk is unbounded. |
| S-curve | Smoothstep applied to the velocity ramps | Bounded jerk. Slightly slower, much gentler on gearboxes — and it is what stops a taught path from visibly shaking a lightweight arm. |
Scheduling works on a normalised path parameter s ∈ [0, 1], which keeps the maths
independent of the joint count and of whether a given joint is revolute (degrees) or prismatic
(metres). Velocity and acceleration limits are set per joint under the motion panel, and a
waypoint can scale them down locally for a slow approach.
5Solving the path
Every interpolated sample is solved with the robot's exact IK. Two details make the result usable rather than merely correct.
5.1 Seeded from the previous solution
IK is one-to-many. Solving each sample independently would let the arm flip between elbow-up and elbow-down mid-path — mathematically valid at every point, and a violent reconfiguration in practice. Each solve is therefore seeded from the previous sample's answer, so the chain stays in one branch.
5.2 Unwrapping
A revolute joint at +179° moving to −179° is a 2° move, not a 358° one. Solutions are unwrapped against the previous sample so the exported numbers describe the short move the robot will actually make.
6Collision & singularity checking
Check Path runs the expensive validation on demand — it is not run on every edit, because it sweeps the whole dense path.
Self-collision
Links are modelled as capsules of a radius derived from the arm's own scale, and every non-adjacent pair is tested along the path. Adjacent links are excluded — they share a joint and always touch.
Obstacles
Boxes and spheres you place in the scene, tested against the same capsules and against the tool point.
Singularities
Each sample's conditioning is checked against a limit. A path that passes through a singularity is one where joint speeds spike towards infinity even though the tool is moving slowly.
A failing check raises a dialog naming what was hit and where, rather than a silent flag on a list you might not scroll to.
7Export & import
| Format | File | Runs on |
|---|---|---|
| Trajectory CSV | .csv |
Anything — spreadsheet, custom driver, a script of your own |
| Trajectory JSON | .json |
Anything. Carries the full plan including waypoints and segments, so it round-trips back into NeuroIK |
| Epson SPEL+ | .prg |
Epson RC+ controllers |
| G-code | .gcode |
CNC and 3D-printer style controllers, GRBL |
| ROS 2 JointTrajectory | .py |
ROS 2 Humble/Iron, joint_trajectory_controller |
7.1 Joint names in the ROS 2 export
NeuroIK's display labels look like θ1 (shoulder) — readable in the UI, useless to a
joint_trajectory_controller, which matches names against the URDF. The exporter takes
the part before the parenthesis and cleans it into an identifier, so an imported URDF's real joint
names survive into the generated node.
7.2 Import
JSON and CSV can be read back. A JSON plan restores waypoints, segments and motion profiles; a CSV of points restores the geometry. This is how a path built on one robot is moved onto another, and how a path generated elsewhere is brought in to be checked.
8What this workflow will not do
- It will not plan around an obstacle for you. It checks the path you taught. There is no sampling-based planner here — no RRT, no PRM — so a blocked path is reported, not re-routed.
- It will not choose your velocity limits. Those come from your drives' datasheets. The defaults are placeholders, and a schedule computed from a placeholder is a schedule about a robot you do not own.
- It does not model dynamics. The profile respects velocity and acceleration limits, not torque limits. Whether your motors can actually deliver that acceleration is the Torque & Dynamics Studio's question, and the two are worth running together before committing a path to hardware.
1What the IK Calculator does
One target pose in, every joint solution out — with the algebra that produced it shown line by line, in your numbers. Where the ML workflow learns an approximate inverse, this studio computes the exact one and shows its working.
Solve
Closed-form where the geometry permits, numerical where it does not, and both side by side when you want to compare.
Derive
Each step of the derivation with the real substituted values, not a generic textbook formula — so you can check a number rather than trust it.
Validate
Every solution is fed back through forward kinematics and checked against the joint limits before it is offered.
Compare
Run every applicable method on one target and see success, solution count, position and orientation error, iterations and time.
A 3D viewport shows the arm in the chosen solution, with the target marker at the pose you asked for — so a solution that reaches the right point in the wrong configuration is visible rather than buried in six numbers.
2Which methods a robot gets
Available methods are decided by the robot, not offered blindly. A closed form that does not exist for your geometry is not listed.
| Robot | Closed form | Numerical |
|---|---|---|
| SCARA | Exact, with lefty/righty branches | Available |
| Cartesian | Direct axis mapping — the "inverse" is a rename | Available |
| Articulated, 2R / 3R planar | Exact planar closed form | Available |
| Articulated, 6-DOF with a spherical wrist | Pieper decomposition, gated (see below) | Available |
| Articulated, other DOF | None — no general closed form exists | Available |
| Imported URDF | None — geometry is arbitrary | Available |
| Delta | Trilateration (parallel mechanism, not a serial chain) | — |
3Closed-form solvers
A closed form returns every solution at once, exactly, in microseconds — and tells you how many there are, which a numerical solver never can.
3.1 SCARA
Two solutions for a reachable point: elbow-left and elbow-right. The forward kinematics is
T = Rz(θ₁)·Tx(L₁)·Rz(θ₂)·Tz(d₃)·Rz(θ₄)so x = L₁c₁ + L₂c₁₂, y = L₁s₁ + L₂s₁₂, z = d₃ and
yaw = θ₁+θ₂+θ₄. The elbow follows from the law of cosines, the shoulder from a
two-argument arctangent, the slide is read straight off z, and the wrist absorbs
whatever yaw is left over.
3.2 Planar 2R and 3R
Standard closed forms, with the reachability test done before the arctangent rather than after — so an unreachable target is reported as unreachable instead of as a NaN.
3.3 Cartesian
Each prismatic axis maps to one coordinate. The inverse is a rename plus a limit check, and it is documented as such rather than dressed up as a derivation.
3.4 Six-DOF with a spherical wrist (Pieper)
When the last three axes intersect at a point, position and orientation decouple: the wrist centre is found by stepping back from the target along the approach vector, the first three joints place it, and the last three take whatever rotation remains. Up to 8 solutions.
4Numerical solvers
Three iterative methods, all built on the same core loop so they differ only in the step they take.
| Method | Step | Behaviour |
|---|---|---|
| Damped least squares | Δq = Jᵀ(JJᵀ + λ²I)⁻¹ e | The default. Stable through singularities — damping trades a little accuracy for a finite step where the pseudoinverse would demand an infinite one. |
| Pseudoinverse | Δq = J⁺e | The minimum-norm step. Fastest convergence away from singularities, unstable near them. |
| Newton-Raphson | Δq = J⁻¹e | Square Jacobians only. Quadratic convergence when it works. |
4.1 Multi-start
Every numerical method restarts from several seeds. A single start finds a local answer; a target with eight valid configurations reached from one seed reports one of them, and gives no hint the other seven exist.
4.2 Convergence is scored on both errors
The best iterate is tracked as
score = max( position_error / position_tolerance ,
orientation_error / orientation_tolerance )4.3 Uncontrollable axes are masked, not down-weighted
A SCARA cannot roll or pitch. Asking it to is not a small error to be weighted down — it is a constraint that does not exist. Those rows are removed from the Jacobian entirely and the remaining ones are weighted equally.
5Live derivation
Solving shows the derivation for the method that produced the answer — each step with its formula, the same formula with your numbers substituted, and the result.
Step 3 — Elbow angle from the law of cosines
  cos θ₂ = (x² + y² − L₁² − L₂²) / (2·L₁·L₂)
  cos θ₂ = (0.55² + 0.26² − 0.40² − 0.30²) / (2 · 0.40 · 0.30)
  cos θ₂ = 0.5000   →   θ₂ = ±60.00°
Steps are rendered with KaTeX and each carries an ok flag, so a step that failed — an out-of-range arccosine, a target beyond reach — is marked at the point where the algebra broke down rather than reported as a generic failure at the end.
6Comparing methods
Compare every method runs all applicable solvers on one target.
| Column | Means |
|---|---|
| Success | Whether it converged inside tolerance. n/a where the method does not apply to this robot. |
| Solutions | How many distinct valid configurations were found. Closed forms typically report several; numerical methods report what their restarts happened to reach. |
| Pos error | Distance from the commanded position, in millimetres. |
| Ori error | Angle between commanded and achieved orientation, in degrees. |
| Iterations | Zero for a closed form — that is the point of one. |
| Time | Wall-clock milliseconds. Expect three or four orders of magnitude between a closed form and a multi-start numerical solve. |
The best method is badged. On a narrow window the table restacks rather than scrolling sideways.
7Validation
A solution is only offered after it passes three checks.
- Joint limits — every value inside its own travel.
- Forward kinematics round-trip — the solution is pushed back through FK and the resulting pose compared against the target.
- Distinctness — duplicates that differ only by numerical noise are collapsed, so "4 solutions" means four genuinely different arm configurations.
8DH tables and their honest limits
The calculator shows the kinematic description behind the solve. It comes in four kinds, and the kind is stated rather than glossed over.
| Kind | Shown for | What it is |
|---|---|---|
dh | SCARA, articulated | A real Denavit-Hartenberg table, verified to reproduce the engine's own forward kinematics. |
direct | Cartesian | An exact axis-to-coordinate mapping. |
urdf_chain | Imported URDF | The parsed origin/axis chain, exactly as the file states it. |
none | Delta | Not a serial chain; no DH table can describe it. |
Rz(θ)·Rx(α) whose bottom row is always
(0, sin α, cos α); three prismatic rows therefore cannot compose back to the
identity orientation a Cartesian robot has by construction. There is no valid three-row DH table
for a gantry, so NeuroIK shows the exact direct mapping instead of a fabricated one. The same
applies to a general imported URDF: no exact URDF→DH conversion exists, and NeuroIK does not
invent one.
1What the Jacobian Studio does
Inverse kinematics answers can the arm get there. This studio answers how well can it move once it is there — which directions are easy, which are expensive, and how close the pose is to losing a direction of motion entirely.
The Jacobian J maps joint rates to tool rates:
ẋ = J(q) · q̇Everything on the page is a property of that matrix at the current configuration. Move a slider and all of it recomputes.
2Building the Jacobian
2.1 Two methods
| Method | How | Measured cost |
|---|---|---|
| Finite differences | Central differences on the engine's own FK | ≈ 0.69 ms |
| Autograd | PyTorch reverse-mode through the differentiable FK | ≈ 11.6 ms |
They agree to about 2 × 10⁻⁸ relative. Finite differences is therefore the default for interactive work and for sweeps: a 25×25 map is 625 Jacobians, which is 0.4 s by differences and 7 s by autograd, for a difference invisible at chart resolution.
2.2 Structural rows
A SCARA has no roll or pitch. Keeping those rows would give the matrix two permanently zero rows, and every rank and condition number computed from it would be wrong.
NeuroIK finds the structurally controllable rows by sampling many configurations
and taking the union of the rows that are ever non-zero — not by inspecting one pose. A single pose
can have an accidentally zero row, and using it would report a permanent structural fact where there
was only a momentary one. For a SCARA the result is vx, vy, vz, ωz.
2.3 Units and Euler rates
Columns are normalised per radian (or per metre for a prismatic joint), so a mixed arm's columns
are comparable. Where orientation is expressed as Euler rates, the mapping ω = E(rpy)·ṙpy
is applied — and gimbal lock in that mapping is flagged separately from a genuine
mechanical singularity, because one is an artefact of the representation and the other is a property
of the machine.
3The SVD metrics
Everything is derived from one singular value decomposition, J = UΣVᵀ.
| Metric | Definition | Read it as |
|---|---|---|
| Singular values σ | Diagonal of Σ | The gain along each principal direction. The smallest is the direction the arm is worst at. |
| Rank | Count of non-negligible σ | How many independent directions the tool can move in right now. Less than full means one has been lost. |
| Condition number κ | σ_max / σ_min | The headline number. Scale-free, so it is the one to threshold on. 1 is perfectly isotropic; ∞ is singular. |
| Manipulability w | √det(JJᵀ) | Yoshikawa's index — the volume of the velocity ellipsoid. Zero exactly at a singularity. |
| Isotropy | σ_min / σ_max | κ inverted, bounded in [0, 1]. Convenient for a bar or a colour. |
4Thresholds and why not det(J)
Four verdicts, from the condition number with a smallest-singular-value backstop.
| Status | Default rule | Meaning |
|---|---|---|
| SAFE | κ < 30 | Well conditioned in every direction. |
| WARNING | 30 ≤ κ < 100 | Degraded. One direction is getting expensive. |
| NEAR_SINGULARITY | κ ≥ 100, or σ_min below its floor | Nearly unusable; joint speeds are climbing steeply. |
| SINGULAR | Rank deficient | A direction of motion is gone. |
30 and 100 are the conventional working numbers for serial manipulators. They are editable — a small delta and a long redundant arm genuinely differ — and the thresholds actually applied are returned with every verdict, so a result is never un-reproducible.
5The velocity ellipsoid
The 3D view draws the set of tool velocities produced by a unit sphere of joint speeds. Its axes are the singular vectors and its radii the singular values.
- Round — the arm moves equally well in every direction.
- Flattened — the short axis is the direction that is becoming expensive.
- A disc — that direction is gone; the pose is singular.
This is the same information as κ, in the form where it is obvious which direction is in trouble — a number cannot tell you that, and it is usually the thing you need in order to decide where to move the path.
6Differential kinematics
6.1 Forward — joint rates in, tool velocity out
One matrix product. Always defined.
6.2 Inverse — desired tool velocity in, joint rates out
Near a singularity an exact inverse asks for joint speeds no machine can produce. Four methods:
| Method | Behaviour |
|---|---|
| Auto | Damp only when the pose is near singular. The sensible default. |
| Exact inverse | Square, full-rank Jacobians only. |
| Pseudoinverse | Minimum-norm solution; exact but unbounded near a singularity. |
| Damped least squares | Bounded joint speeds, at the cost of tracking error. |
7The singularity map
Pick one joint for a curve, two for a heatmap. The remaining joints stay where the sliders leave them.
7.1 One joint — a curve
Manipulability and 1/κ across that joint's full travel, with the exact crossings into trouble listed underneath rather than left to be read off the chart by eye.
7.2 Two joints — a heatmap
Colour is log₁₀ κ, stretched over the range the scan actually covers. Two deliberate choices:
- Logarithmic, because κ is a ratio: the step from 8 to 16 matters as much as the step from 80 to 160.
- Fitted to the healthy cells, because singular ones run to infinity and would otherwise own the entire scale. Cells at or past the near-singular threshold are pinned to the dark end and counted in the legend, so nothing is hidden by fitting the scale to the rest.
Hovering any cell gives its exact joint values, κ, w and σ_min. Legend endpoints are labelled with real condition numbers, not just "singular" and "good".
8Editing the arm in place
Conditioning is a property of the mechanism, so the questions worth asking here are about the mechanism. Three things are editable without leaving the page, and every one of them recomputes the Jacobian, its SVD, the verdict and the 3D model.
DOF
Within the range the robot type allows — SCARA 3–4, Cartesian 3–6, articulated 2–12. Delta is fixed at 3 and an imported URDF is fixed by its parsed chain.
Link lengths
The moment arms that set every entry in the linear rows. Shorten a SCARA's forearm from 0.30 to 0.15 m and manipulability halves — w is linear in link length.
Joint travel
The exact interval the singularity map scans. Narrowing a limit clamps the current pose into it and says so; an inverted range is refused rather than silently swapped.
8.1 Ranking IK solutions
Given a set of candidate solutions — analytical, numerical or ML-predicted — the studio scores each on conditioning and on how much joint travel is left before a stop, and ranks them. This is the cross-check the whole studio exists for: an ML prediction being close to the target says nothing about whether the pose it lands in is a usable one to command from.
1What the Torque & Dynamics Studio does
What each joint actually has to deliver:
τ = M(q)·q̈ + C(q, q̇)·q̇ + G(q) + F(q̇)| Term | Is | Matters when |
|---|---|---|
| M(q)·q̈ | Inertial torque | Accelerating. Dominates on fast moves. |
| C(q, q̇)·q̇ | Coriolis and centrifugal | Moving several joints at once, at speed. |
| G(q) | Gravity | Always. The only term that is non-zero standing still. |
| F(q̇) | Friction — viscous and Coulomb | Always, if you enter it. Zero if you do not. |
2The mass-data gap, stated up front
NeuroIK's robot recipe carries link lengths, joint types and limits. Nothing physical. No robot in this application arrives with the mass, centre of mass and inertia tensor that dynamics needs — and this module will not invent them, because a made-up mass produces a made-up torque and nothing downstream could tell.
So the studio opens with a gate. There are exactly three provenances, and they are never conflated:
| Source | Where from | Badge |
|---|---|---|
urdf | An <inertial> block in an imported file, or from the CAD → URDF Studio | entered |
manual | Typed in — from CAD, or from a scale | entered |
estimated | Computed from a geometric primitive and a material density | ESTIMATED |
3Physical properties
3.1 Robot geometry
DOF and link lengths are editable here, because both change the torques directly — link length is the lever arm gravity acts through. Changing DOF regenerates estimates automatically (they were derived numbers anyway) but never silently reshapes values you typed: the page drops back to the gate and says the properties described a different number of links.
3.2 Total robot mass
If you have put the arm on a scale, type what it weighs. Every link is rescaled by the same factor, which is exactly a uniform change of density — inertia is linear in mass at fixed geometry, so every tensor scales with it and the centres of mass do not move at all.
3.3 Estimating from a primitive
Each link is modelled as a tube running along the offset to the next joint, with its centre of mass at the midpoint of that offset — which is where a uniform link's mass actually sits.
3.4 Plausibility checks
Check plausibility tests each link against the physics an inertia tensor must satisfy — positive mass, positive-definite tensor, triangle inequalities on the principal moments — and reports what fails and why.
4How the torques are found
Recursive Newton-Euler, in the Craig frame convention. An outward pass propagates velocity and acceleration from base to tip; an inward pass propagates forces and moments back, and the joint torque falls out as the projection onto each joint's own axis.
| Quantity | Obtained by |
|---|---|
| Gravity torque G(q) | RNEA with q̇ = q̈ = 0 |
| Mass matrix M(q) | One RNEA call per column, with a unit acceleration on one joint and gravity off |
| Coriolis C(q,q̇)q̇ | RNEA with the real q̇, gravity and q̈ off |
| Friction F(q̇) | Viscous + Coulomb, per joint, from the actuator table |
The breakdown sums exactly to the total, so a term can be attributed rather than guessed at. Gravity defaults to the standard 9.80665 m/s² and is editable — including to zero, which is a real use case and produces a genuinely different answer.
4.1 Payload
A payload is combined into the last link by the parallel-axis theorem, at the grip offset you give. Picking something up does not add a degree of freedom, so it is not modelled as one.
5Live torques
Move the joint sliders and the torque breakdown updates. A schematic arm is drawn beside them — six joint angles are hard to picture, and this is the same numbers, drawn.
Per-joint bars show each torque as a share of that joint's own limit where one is entered. With no limit there is nothing to be a fraction of, so the bar falls back to a share of the largest torque in the pose and says so.
5.1 Worst gravity pose
A button searches for the configuration that demands the most torque — the one that decides motor size.
6Trajectory analysis
Feed in a timed trajectory — one taught in the Motion & Path Planning studio, or built here — and the studio reports per joint:
| Figure | Sizes |
|---|---|
| Peak torque | The drive's peak/stall rating |
| RMS torque | The continuous rating — this is the thermal question, and it is the one people skip |
| Peak power | The supply and the drive electronics |
| Energy | Trapezoidal integration of |τ·q̇| over the move |
| Peak at | The instant the peak occurs, so you can look at what the arm was doing |
Velocities and accelerations are inferred from the trajectory if absent, and the studio says it did so — a torque computed from a derivative you did not supply should announce itself.
7Payload & motors
7.1 Payload at this pose
What the arm can hold exactly where it is standing. Useful, and on its own misleading.
7.2 Payload across the envelope
The worst case anywhere the arm can reach — the figure that belongs on a spec sheet. A payload search is bisected at every sampled pose, so it takes real time and reports as it goes: a progress bar, a pose counter, elapsed time, an ETA once the rate means anything, and the worst payload found so far converging in front of you.
7.3 Motor advice
Per joint: peak required, continuous required, the gear ratio you entered, both figures referred back to the motor shaft, and a suggested drive class. Gearing is applied where you state it — torque divides and speed multiplies — because a 100:1 reduction is the difference between a plausible motor and an impossible one.
8What this studio will not do
8.1 Friction defaults to zero
8.2 A delta gets no dynamics at all
Recursive Newton-Euler walks a chain from base to tip. No ordering of a delta's links reproduces its kinematics — its three arms share the platform as a closed loop. Dynamics for a parallel machine needs a different formulation, which this module does not implement.
8.3 It is rigid-body dynamics
No link flexibility, no gear backlash, no drive-train compliance, no thermal model beyond the RMS figure. For a stiff industrial arm these are second-order; for a long slender one they are not.
9How the maths was verified
Each engine was checked against something known to be correct, not merely run.
| Check | Against | Agreement |
|---|---|---|
| Gravity torque, 2R arm | The closed-form planar solution | 3.5 × 10⁻¹⁵ |
| Mass matrix M | Symmetry and positive-definiteness, 40 random poses | 40 / 40 |
| τ = Mq̈ + Cq̇ + G | Direct RNEA at the same state | 8 × 10⁻¹⁶ |
| Payload torque | −Jvᵀ(m·g) from the Jacobian | 4 × 10⁻⁷ |
| Energy | Numerical gradient of the potential | 7 × 10⁻¹⁰ |
| Mass scaling | Linearity of τ in mass at fixed geometry | 8.9 × 10⁻¹⁶ |
| Kinematic chain | Each engine's own forward kinematics, 1200 configurations | 1 × 10⁻¹⁶ |
1What the CAD → URDF/Xacro Studio does
The upstream step: where a robot comes from when all you have is meshes. Every other workflow in NeuroIK starts by selecting a robot; this one is how a robot gets created.
The four steps
- Import — read and measure your geometry.
- Links & joints — build the tree, set axes, origins and limits.
- Physical properties — mass, centre of mass, inertia.
- Generate — URDF or Xacro, validated, ready to export or load.
2Importing geometry
| Format | Read | Measured |
|---|---|---|
.stl | Directly | Yes — bounds, volume, centroid, triangles |
.obj | Directly | Yes |
.dae | Directly | Rendered, not measured (see below) |
.step .stp .iges .igs |
Tessellated through FreeCAD | Yes, after conversion |
2.1 Files are read from disk, not uploaded
A 200 MB assembly never travels through the browser. Press Browse… and you get a real OS file dialog in the desktop app, or a built-in folder browser in an ordinary browser tab — where a web page is handed a file's name and never its path, so it could not tell the backend which file to read. Multi-select imports a whole folder in one go; each file succeeds or fails on its own.
2.2 STEP and IGES need FreeCAD
FreeCADCmd on
PATH, or set the FREECAD_CMD environment variable, and restart. STL,
OBJ and DAE need none of this.
2.3 COLLADA is not measured
A .dae renders, but its volume is not computed: a COLLADA scene graph can nest and
transform geometry in ways a simple reader would get wrong, and a wrong volume feeds a wrong mass
straight into the dynamics module. Enter that link's mass directly, or supply an STL.
2.4 When a path is refused
Every failure names its own cause rather than a generic "file not found": the folder exists but
holds these files instead, that is a directory, that format needs FreeCAD, the file is zero bytes,
permission denied, the path is relative and the backend has a different working directory. The format
check runs before the existence check, because a .ply that is also mistyped is
still a .ply.
3Units and scale
URDF is always metres. CAD is very often millimetres, and nothing in an STL says which.
Setting the scale updates every placement of that part at once and is written into the generated
URDF as scale="0.001 0.001 0.001". Size and volume are restated in metres as you change
it, so the right answer is obvious: 54 × 25 × 38.2 mm, 51.61 cm³.
4Placement — origin and rotation
An assembly exported in one global coordinate system needs an offset on almost every part. Each placement carries a position in metres and a rotation in degrees.
Quarter-turn buttons
X / Y / Z 90° (Shift for −90°). The common CAD fix is one quarter turn — Z-up versus Y-up between packages.
Centre
Offsets the part so its centre of volume sits on the link origin.
Sit on z = 0
Offsets it so its lowest point rests on the floor plane.
Reset
Back to the identity.
rpy is R = Rz(yaw)·Ry(pitch)·Rx(roll). The preview applies
exactly that convention, so what you see is what the file says.
4.1 Where placements live
A placement belongs to a mesh on a link, not to the mesh. The same bracket used twice — mirrored left and right — has two placements that must differ. A mesh not yet assigned to a link carries a default placement instead, which is copied across when you assign it, so a part squared up before assignment stays squared up.
5Links & joints
5.1 Build links from meshes
One click gives every unassigned mesh a link named after its file and chains them together. Run it again and it extends the existing chain rather than branching off the base.
5.2 Assignment is many-to-one
One link can take several meshes. A CAD assembly is modelled for manufacture, and a single rigid link is very often a housing, two brackets and a handful of fasteners. A supplier's file might ship thirteen parts for what should be six rigid bodies, so assign each mesh explicitly rather than assuming the CAD structure is the robot structure.
5.3 Joints
Per joint: type (fixed, revolute, continuous,
prismatic), parent and child, origin, axis and limits. Axis presets cover the common
cases, and a typed vector is normalised for you — a non-unit axis is read differently by different
parsers.
5.4 Live preview
The viewport walks the joint tree and applies each joint's origin, so it shows exactly what the generated URDF shows with every joint at zero. The link you are editing lights up blue — clicking a name in the tree tells you which lump of geometry it actually is, which is the hardest thing to work out from a parts list.
6Physical properties
Mass, centre of mass and inertia per link — the data the Torque & Dynamics Studio needs and has no other source for on an imported robot. Entering it here carries it straight through, with no translation step.
Each link can be estimated from its own geometry: a measured mesh volume plus a material density where the mesh is watertight, or the dimensions of a primitive where it is not.
Everything estimated keeps its ESTIMATED badge, and the badge travels into the generated package's README because a URDF has nowhere to record provenance.
7Generating the file
| Choice | Effect |
|---|---|
| Format | URDF, Xacro, or both |
| Package name | Set it for package:// mesh paths in a ROS workspace. Leave it blank for relative paths, which is what makes the exported folder work when it is simply unzipped somewhere. |
| Xacro macros | Off by default |
<xacro:macro>, so a file with macros in it cannot be read back by the
application that wrote it until you pre-expand it with
xacro robot.xacro -o robot.urdf. That is a real limitation, and it is better stated
than discovered.
7.1 What the generator writes
- An
<origin>only where it is not the identity — a file full ofxyz="0 0 0" rpy="0 0 0"makes the meaningful origins harder to find. - An explicit
<collision>block, falling back to the visual geometry when you have not given a separate one, rather than relying on readers to infer it. - ASCII only. These files get opened by ROS tooling, editors and shells on machines with every locale imaginable, and a stray arrow in a comment is not worth one of them choking on the robot description.
7.2 Validation
Errors block generation; warnings do not. The distinction is real: a missing inertial block makes the file useless for dynamics but perfectly fine for visualisation, so it is a warning. A cycle in the joint tree is an error — URDF is a tree.
Where a package is generated, a short list of ROS 2 commands is included for checking it —
check_urdf, a robot_state_publisher launch — with a line on what each one
would tell you.
8Export & reuse
Export package (.zip)
The description plus a meshes/
folder with every referenced file copied in, and a README recording what was measured, what
was entered and what was estimated.
Load as this project's robot
The generated robot becomes a Custom URDF robot everywhere in NeuroIK — trainable in ML for IK, plannable in Motion & Path, analysable in the Jacobian and Dynamics studios.